Types of Photography
06/01/2026
Architectural Photography
Another self-explanatory genre, architectural photography is when the main subject matter of the photograph is a building’s exterior or interior. These shots tend to be pretty accurate representations of the construction that are taken in a way that is also aesthetically pleasing to the eye.
Exterior shots usually use daylight to capture the building along with nearby landscaping features. They can also be shot at night using ambient lighting from street lights, surrounding landscape, or moonlight.
Black and white photography
Black and white (B&W) photography focuses on capturing an image with no color. This can either be done through a camera setting or through editing a color image afterward. Monochrome images that use minimal amounts of lighting also fall under this category.
Commercial photography
Commercial photography is that which is taken specifically for commercial use, usually to promote or sell a product or service. Photographers are hired to take shots of the product to be used in marketing collateral like brochures, menus, pamphlets, and beyond. Images of services can be staged using models or staff. Food photography, fashion photography, and product photography sometimes double as commercial photography. Headshots are another popular piece of the puzzle for this genre.
Editorial photography
Usually used in newspapers and magazines, editorial photography incorporates aspects of fashion, sports, and event photography, typically shot in a candid nature. Generally, these types of photos are meant to illustrate a story that’s newsworthy, educational, and/or informative.
Event photography
Event photography captures guests, activities, and the ambiance of a gathering. Weddings, christenings, corporate parties, birthdays, dances, awards ceremonies, funerals, conferences, live concerts, and other engagements fall under this category of photography.
Film photography
Film photography dates back to the late 1800s and is the precursor to digital photography. “Safety film” was introduced by Kodak in 1908, although previous iterations of film were used as early as 1889, but were made from the much more flammable material, nitrocellulose — usually referred to as “nitrate film”. Color film was introduced for home movies in 1935 by Kodachrome, and 35mm film lengths were used for still cameras as of 1936.
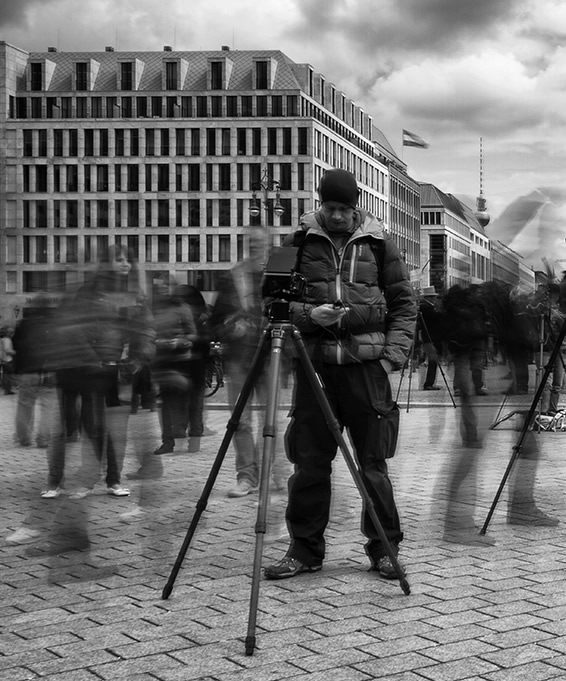
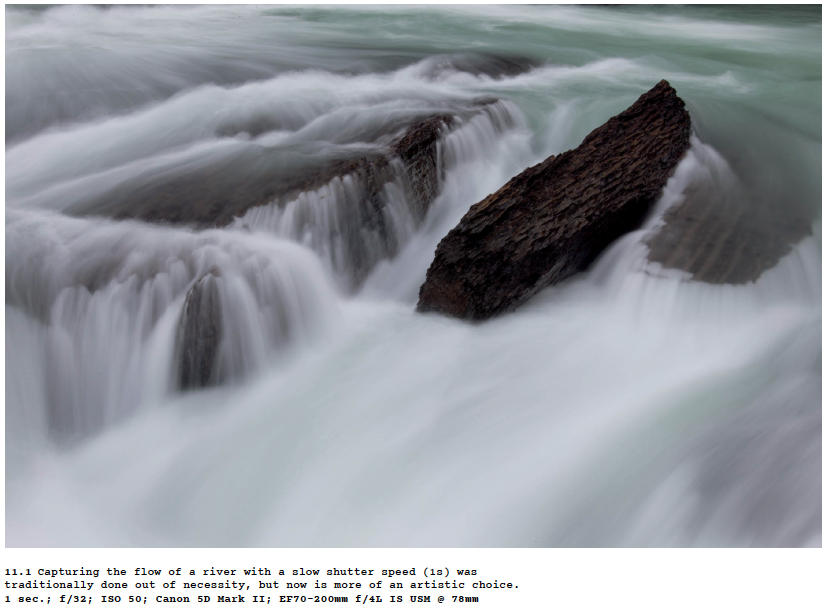
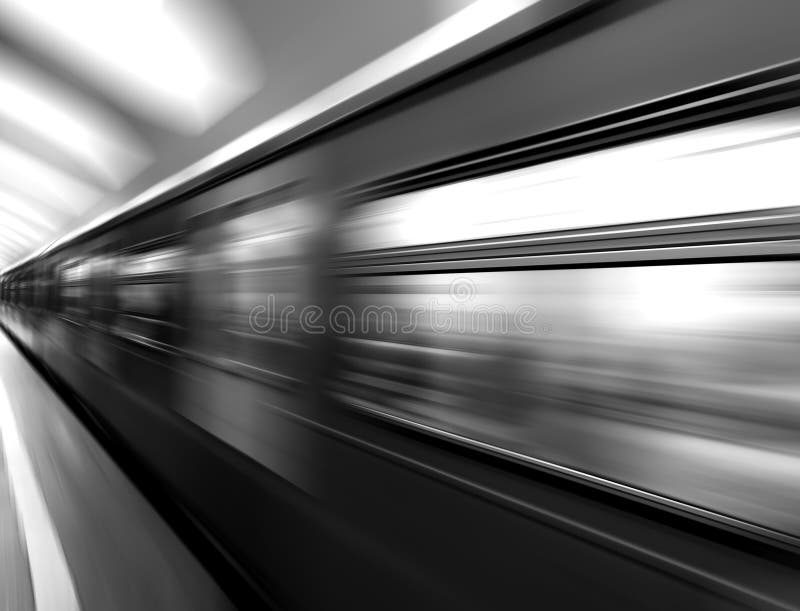
Long exposure photography
Long exposure photography, also known as time exposure or slow-shutter photography, uses a long duration of shutter speed to capture stationary aspects of a scene sharply, while blurring or smearing the moving aspects. It differs from conventional photographic practices as it captures an image over an extended period of time, instead of in a single snapshot.
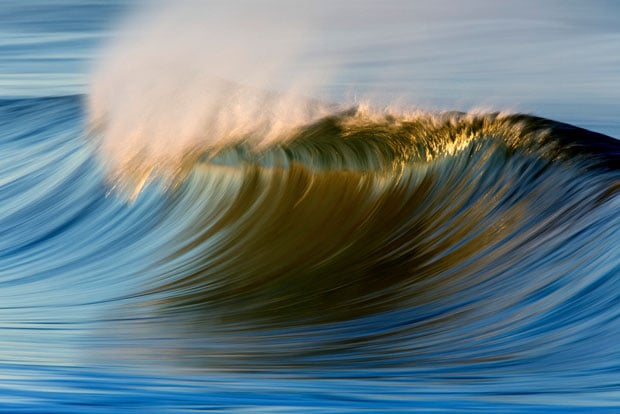
Photographing moving water, such as a waterfall or stream, using long exposure creates a mist-like effect around the water, blurring together its movement while the rest of the scenery retains its sharpness.
Portrait photography
Portrait photography captures a portrait of a person or group of people. Portraiture is a challenging genre of photography because it needs to use lighting, backdrop, and posing to convey the personality of the subject in a single shot. Self-portraits and silhouettes, as well as headshots, also fall under this genre.
Long Exposure Portraits: 6 Creative Ideas
Shutter Speed for Motion Blur: To jog your memory, the longer the duration of the shutter speed, the more motion blur you’ll capture from the moving objects in the photograph. In addition, the faster objects will show more blur than the slower objects at the same shutter speed. As an example, if a car is moving fast through the scene, a shutter speed of 1/30th might capture some of the motion of the car. But if the car is moving slowly, you might need a shutter speed of a full second or slower to capture the desired motion “look.”
Camera Shake: The second concept to understand for long exposure portraits is the concept of camera shake. Camera shake is a common problem that occurs when the camera is not held still during the exposure. So, essentially, the entire photograph is blurry instead of isolating the blur to the moving object only. There are several techniques that can be used to avoid or reduce camera shake, such as using a tripod, setting a slightly faster shutter speed, or using flash to freeze the subjects.
Using Flash to Freeze Motion: The third concept to understand is that flash can freeze motion on the subjects or objects that the flash is hitting. So, for example, photographers can intentionally move the camera and create intentional camera shake while freezing the subject with flash. We’ll review this technique later in this article.
Ideas for Long Exposure Portraits
1. Capture the Motion in Traffic and Cars
Tips for Capturing Long Exposure Portraits With Traffic
- Remind your subject(s) to hold very still
- Larger vehicles, such as buses, take up more space in the frame and can therefore be more impactful than smaller vehicles.
- Vehicles moving around windy roads can be more visually interesting than vehicles going in a straight line.
- If you are having trouble getting enough traffic to go through the scene, consider doing a composite photo, capturing a plate shot of your couple with no cars in the frame and then taking several more shots with cars passing through the frame. Then, you can stack the photos in post and mask out any streaks of light that pass directly in front of your subjects. You can learn more about shooting and editing composite portraits in this beginner’s guide.
2. Capture the Motion in Crowds

People in motion also make for great long exposure props to draw attention to your subject(s). This technique is perfect for crowded public areas such as landmarks or tourist attractions. Rather than battle the crowds, work with them, and use them in your compositions.
3. Capture the Motion in Waves and Water

Photo by Chad Winstead (Website | Wedding Maps Profile)
The motion in the ocean makes an excellent backdrop for long exposure portraits. For these types of portraits in this setting, use wide angle lenses (15-35mm) to exaggerate the motion in the photo. Because wide angle lenses tend to feature more lens distortion around the edges, place subjects in the center of the frame to minimize the effects of lens distortion on my subjects. Speaking of subject placement, with such a pronounced horizon, you should place your subjects’ heads below or well over the horizon. Avoid placing their heads on the horizon line.
4. Capture the Motion of a Wedding Party
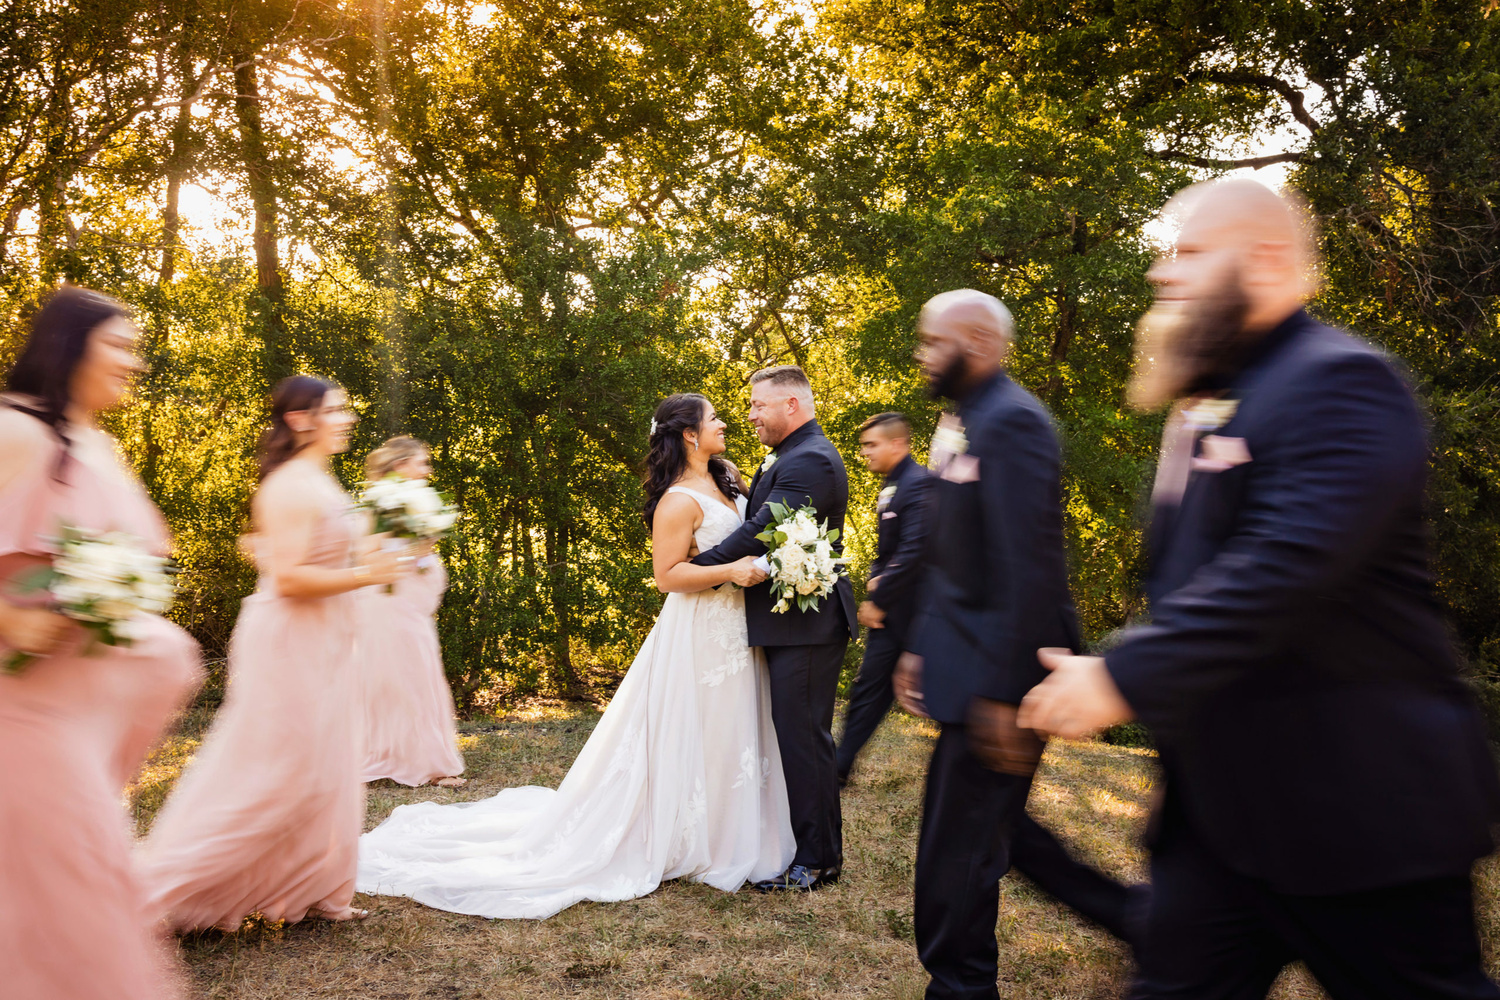

There are so many creative ways to capture the world on camera. And long exposure photography, which slows down the shutter speed to highlight key elements of a photo, is one of the most impressive.
What Is Long Exposure Photography?
Also known as slow-shutter photography or time-exposure photography, long exposure photography is a technique that allows photographers to condense an extended period of time into one photo. By slowing down the shutter speed, the camera captures both stationary and moving elements, combining both into a single frame. The result is an image that tells a more complete story—and that captures a lot more detail than you could get in a standard shot.
The long exposure technique is used in photography for a couple of reasons. One reason is that it smooths out elements that might otherwise appear blurred or undefined, such as clouds, traffic, or waves. It also softens the overall look of the shot, providing an image that is a lot more ethereal than what you might get if you used a standard speed. It is a popular choice for landscape and nature photography, as well as for astrophotography and other nighttime shots.
Manual Camera
The most important piece of equipment for long exposure photography is a manual camera. Unlike an automatic camera, a manual camera gives you complete control over the shutter speed and aperture value, which is a must for taking long exposure shots.
Tripod
You technically could shoot long exposure without a tripod, but you probably don’t want to. A tripod keeps your camera completely steady during the entire duration of the shot, which, depending on what you’re trying to capture, could be many minutes long. Without it, you risk moving your camera and ruining your chances of getting a sharp image.
Creative Long Exposure Photography Ideas
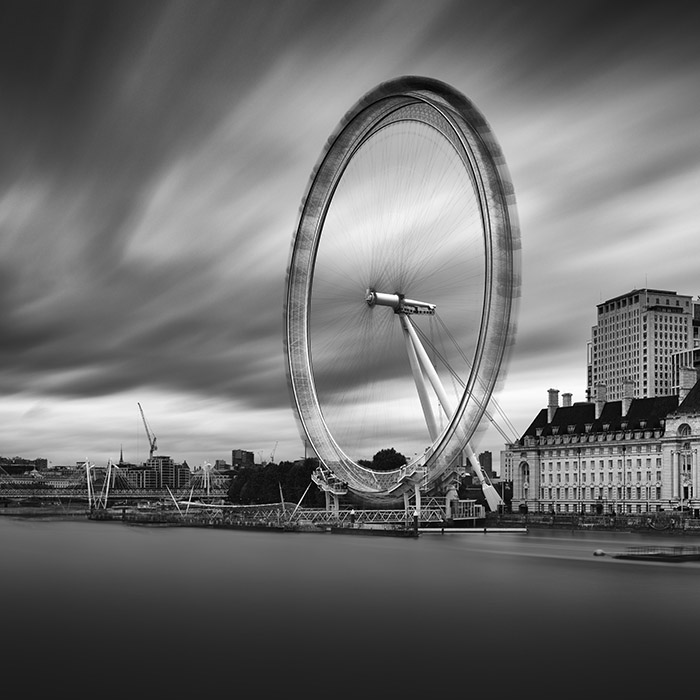
-Follow the light trails. Shoot scenes that feature light in motion, such as Ferris wheels or busy roads.
-Play with portraits. Long exposure isn’t just for landscapes. Try out the technique for portrait photography as well, being sure to work some degree of motion into the shot.
-Go out on a windy day. Motion brings interest to long exposure photographs, and wind brings more of that motion to a scene. Instead of staying home on windy days, venture out with your camera instead—just be sure to bring a steady tripod along too.
Questions:
- How would you describe your level of photography experience? (e.g., Beginner, Hobbyist, Semi-pro, Professional)
- How often do you practice long exposure photography? (e.g., Never, Rarely, Monthly, Weekly)
- What subjects do you primarily use long exposure for? (Select all that apply)
- Water (e.g., waterfalls, oceans, rivers)
- Clouds/Skies
- Cityscapes/Traffic
- Astrophotography
- People/Motion blur
- Other (please specify)
- Do you own a tripod?
- What type of equipment do you use for long exposure photography? (Select all that apply)
- DSLR or mirrorless camera
- Smartphone
- Neutral Density (ND) filters (e.g., 6-stop, 10-stop, variable)
- Remote shutter release or cable release
- Smartphone app for remote control
- Other (please specify)
- When shooting long exposures, which time of day do you prefer?
- Mid-day (using strong ND filters)
- Dawn/Dusk (lower light levels)
- Night
- Do you typically shoot in color or black and white when doing long exposures?
https://forms.gle/b7TqAK98PqXB4se99
1. Artist: Benjamin Huseman

Benjamin Huseman is a landscape and wildlife photographer based in Commerce City, Colorado. His work has been featured by local news outlets, Air Force publications, the Thin Line Photo Festival, and is currently on display on the Las Lagunas Gallery “A Light in the Darkness Online Exhibition”.
Method + Process
Long exposure photos of cars traveling along a road are nothing new. Many of these photos are taken at night when the lights from the cars are easily captured by the camera. It is much harder to capture those lights around dusk and dawn. The lights are not as bright and the shutter speeds in the brighter ambient light are usually much shorter unless you are using a Neutral Density filter to block additional light. When I set out to capture a long exposure photograph at this location, I did not want to wait until the sky had turned dark to take my photo. It was important to me that I incorporate the colors of the sunset into the photo. But, to do so I needed to overcome that challenge of the car lights not being bright. The solution was to take multiple photos.
I arrived at the location an hour before the scheduled sunset. I used this time to scope out the location I wanted to shoot from, set up my gear, check my composition, and relocate my vehicle so it would not be in the photo. As the sun began to set behind the Continental Divide, the sky along the horizon began to glow with a vibrant orange reminiscent of fire. Using my wireless remote, I began snapping photos as the colors developed and then faded. Next, clouds appeared in the upper sky that began to turn pink and purple as the light of the setting sun diminished. I continued taking photos during this time, all the while, being sure not to move the camera. It is important to note that this photo was shot with a Laowa 15mm f/2 lens. The all manual lens was focused to infinity and I did not have to worry about that focus changing. If you are going to shoot a long exposure photo like this and plan on using multiple exposures, place your camera in manual focus.
After the colors of the sunset faded way and the blue hour began, the head and taillights of the passing cars became more prominent. I was keeping track of how long it was taking cars to complete the path of travel, both up and down the mountain, and made sure that my shutter speed was long enough to capture the entire path in a single exposure. As I saw lights appear on the guardrail in the distance or through the trees, I would trip the shutter and watch the cars drive by. My goal was to get traffic going in both directions and was able to capture a few shots that covered that.

Why are you so drawn to long exposure photography?
Using long exposures helps me to move away from the everyday reality of the landscape, which is not something I’m particularly interested in capturing. I don’t set out to “record” a location– and, for many of my images, the location actually becomes completely irrelevant. Capturing the passing of time through a longer exposure totally changes the look and feel of an image, and I just love the results one can achieve. I also find it very relaxing and therapeutic– especially because it slows everything down for me. I really don’t like the feeling of being under pressure or having a time limit for taking a photograph, and I find that I can spend hours at a spot completely unaware of how much time has passed. In this day and age, where we live our lives with so many time constraints, it’s really nice to be able to let all that go while I am out with the camera and just relax.
Why do you prefer black and white photography?
We see our everyday lives in colour, and sometimes it can be distracting and overwhelming in an image. I love the control and freedom that working in black and white gives you, affording one the opportunity to alter how a photograph looks and feels simply by changing the range of tones. From black to white and every shade of grey in between, you have the control to mould the image to your vision.
3. Artist: Samuel Wagner

I really like how this picture is full of bright colors, light and blurred movement, especially at night, where lots of colors stand out.
4. Artist: Marco Bontenbal

Final FMP Essay
Portrait/long exposure photography combines traditional portraiture with a slow shutter speed to capture movement, light trails, or a sense of time around a still subject, creating ethereal or dynamic images where the person stays sharp (if posed) while surroundings blur or lights streak, often using a tripod, low ISO, narrow aperture, and sometimes filters in low light. It emphasizes a subject's stillness within a flowing world, revealing motion invisible to the naked eye.
The History of Long Exposure Photography
In the early 1800s, long exposure photography was invented by Joseph Nicephore Niepce. He was the first person to capture a camera image in 1826. His invention was called heliography, meaning “sun drawing”, from helios and graphê). It is the process of using a camera obscura to create images on light-sensitive materials, like paper or metal plates. The first known photograph in history that used this process was "View from the Window at Le Gras" taken in 1826. This photo shows an exterior view from Niepce's home in France.
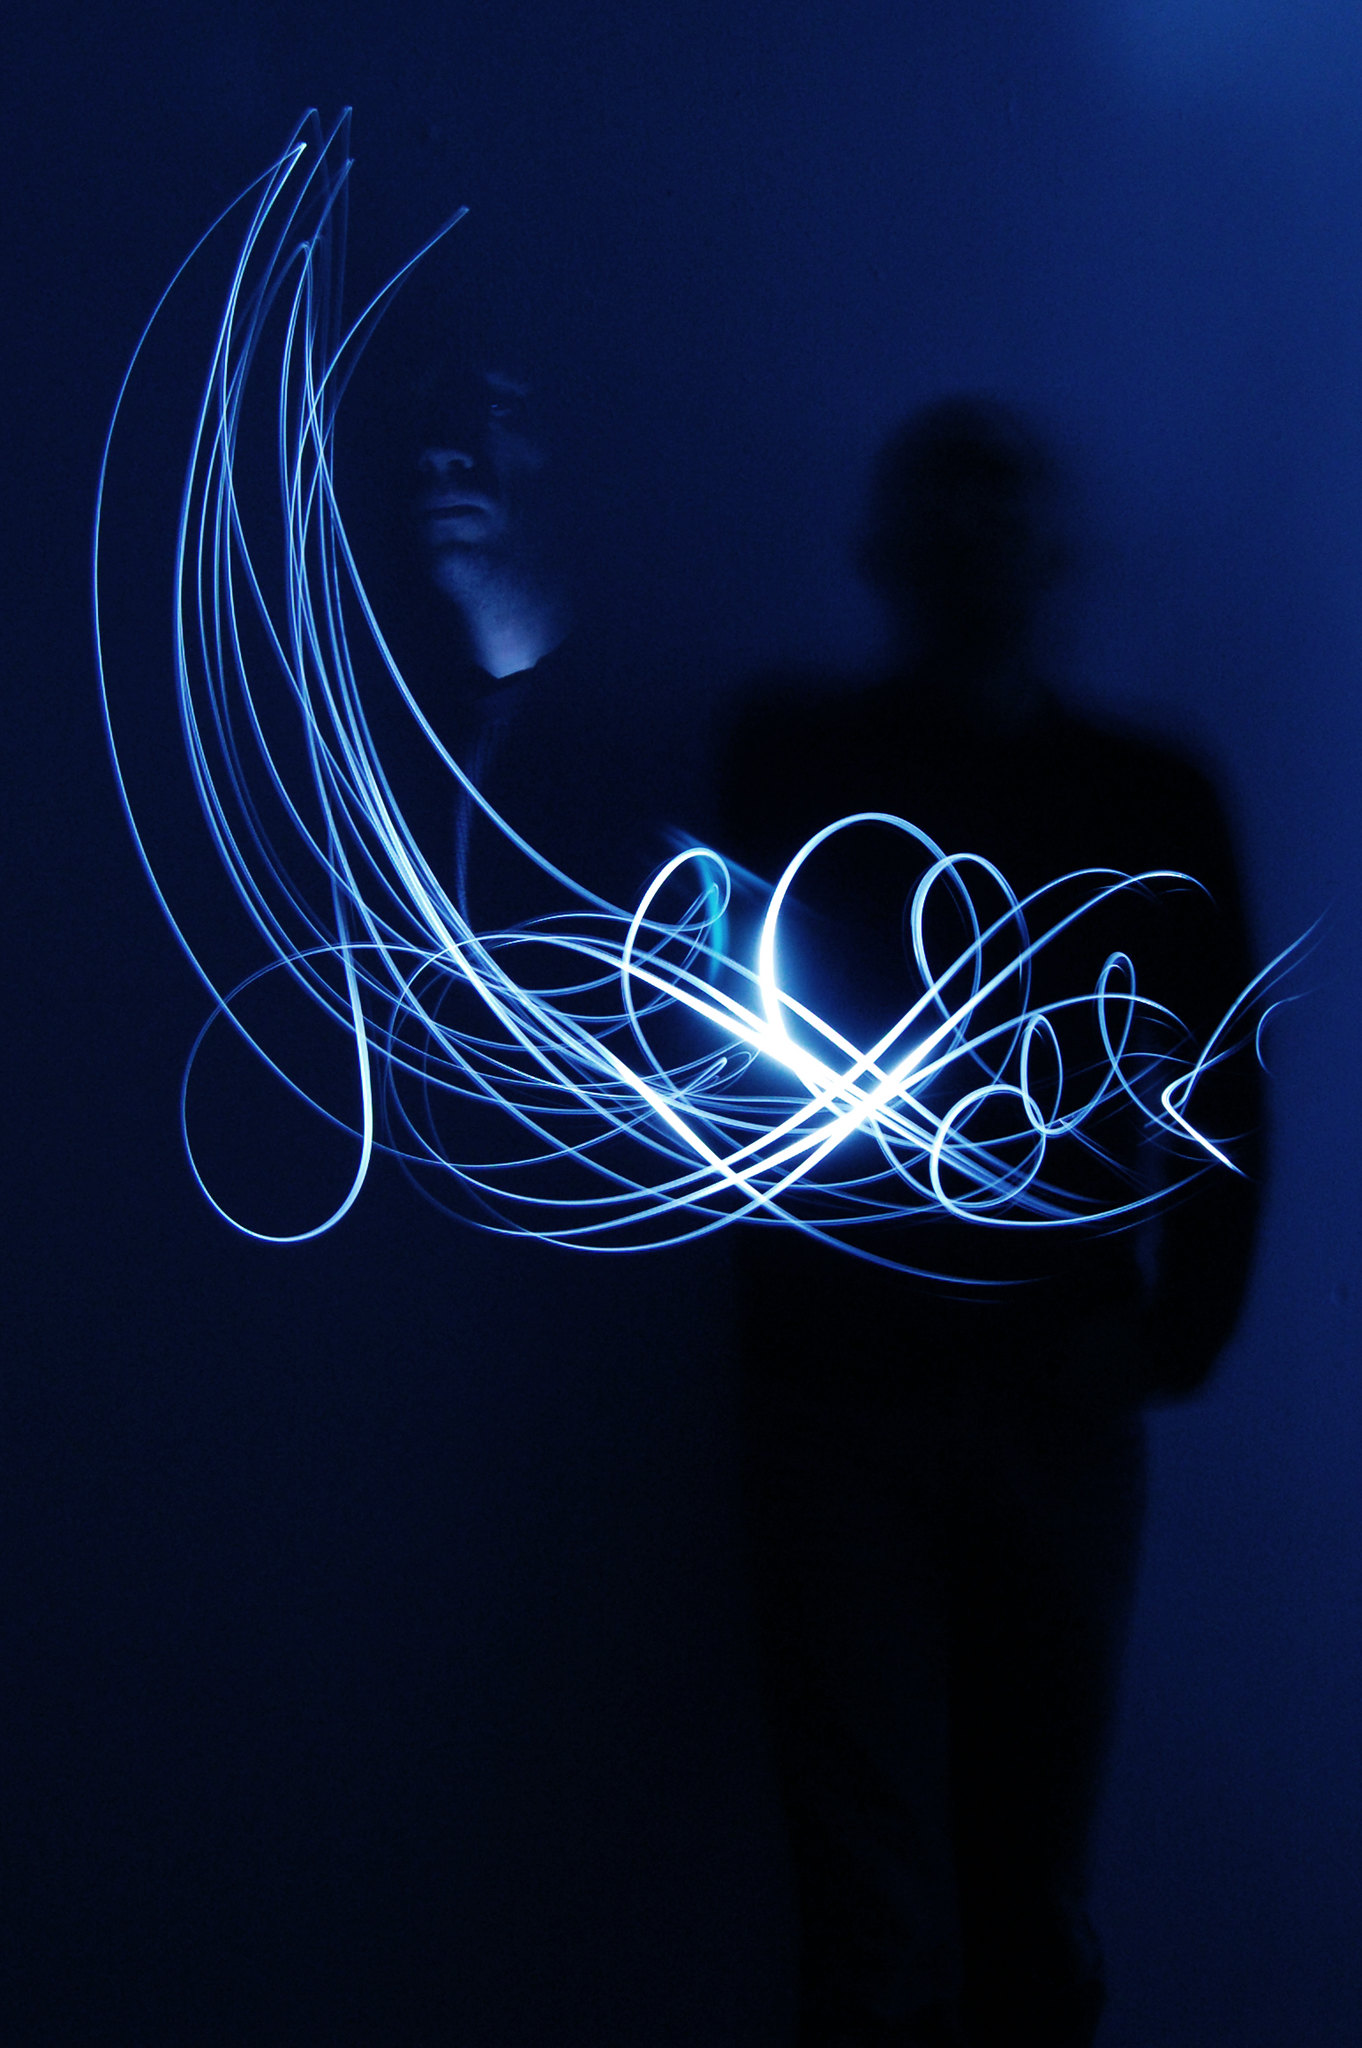
What is light painting?
Light painting is the art of creating photos by setting long exposure times on a camera and using a moving light source to “paint.” A light painting photographer opens a camera’s shutter and keeps it open as they draw in the air with a light source. The finished product is an image of that light source’s path: lines of light through darkness, creating a glowing image in the open lens during the long exposure photography time.
While the invention of photography involved several pioneers in the 1820s and 1830s, the first person to establish a successful commercial business and earn significant money from taking photographs was likely Félix Nadar (born Gaspard-Félix Tournachon) in Paris, who opened his portrait studio in 1854.
Louis Jacques Mandé Daguerre (1787–1851) is recognized as the first person to achieve widespread fame and commercial popularity for photography.
Then, in 1816, a Frenchman, Nicéphore Nièpce, succeeded in capturing small camera images on paper treated with silver chloride (another chemical sensitive to light).
In 1826/7, Nièpce succeeded in making the earliest surviving camera photograph. It represented a view from a window at Le Gras (his hometown in Burgundy, France), captured on a pewter plate coated in bitumen diluted in lavender oil.
How photography changed history
A photography history timeline
1814 – French inventor Joseph Niépce captures the first-known photographic image using the camera obscura with an exposure time of eight hours.
1839 – A French artist and former colleague of Niépce’s, Louis Daguerre, develops the ‘Daguerreotype’ which reduces exposure time to around 30 minutes.
1841 – Englishman William Henry Fox Talbot develops the ‘calotype’ process, reducing exposure time to around one minute.
1968 – Earthrise, the first ever photograph of the Earth is taken by astronaut Bill Anders.
1980 – Sony retail the first camcorder for recording video images.
1984 – Canon display the first DSLR.
1999 – The VP-210 VisualPhone is released. The first mobile phone with a built-in camera.
How has photography changed over time?
As with all advances in technology, a lot has changed over since the very first photographers experimented with capturing still images. Just think, two centuries ago we would need eight hours of exposure to get one grainy image, and now we carry around the power of instant video in our pockets.
The first 100 years of photography were a whirlwind of development as enthusiasts from across the world tried different techniques to get the very best images. From the camera, obscura came processes such as the calotype and the collodion as exposure time was reduced to just a few seconds.
The next 100 years saw several landmarks as the barriers to what was possible in the world of photography were broken. Equipment such as drones, DSLR’s and GoPro’s, previously used by professional photographers soon became commonplace in the kit bags of amateurs. Now, some high-end cameras are built with jaw-dropping 12k resolution – all the more incredible when you consider that someone with 20/20 vision can see in 8k resolution!
Who are the most influential photographers of all time?
The 20th century has seen photographers break new ground and produce iconic images that will last a lifetime. Some of the biggest and most influential photographers include:
1) Ansel Adams
Ansel Adams was a landscape photographer and conservationist whose work became the pinnacle of North American photography. He rose to fame building up a portfolio of incredible images from National Parks across the west coast, most notably Yosemite. Adams was most well-known for his black-and-white landscapes, which he believed was much more expressive than color shots.
2) Richard Avedon
Fashion and portrait photographer Richard Avedon was as big a name as his superstar subjects. Avedon worked with some of the biggest cultural icons in the 20th century, including The Beatles, Marilyn Monroe, and Martin Luther King. With daring and ground-breaking portraits, Avedon’s work became so well-known that the leading role in the Fred Astaire film Funny Face was based on his life.
3) David Bailey
East-ender David Bailey worked for British Vogue during the height of the swinging 60’s shooting some of the biggest stars in fashion and music. Bailey’s working-class upbringing was a marked contrast to other British photographers of the time and allowed him to empathise with his subjects and portray them in a different light. Stardust, the 2014 exhibition showcased 50 years of Bailey’s work and enjoyed a three-month stint at the National Portrait Gallery.
Impact on Modern Photography
Long exposure has had a profound impact on how photographers visualize and document the world:
· Removal of Distractions (Emptying Scenes): In urban photography, extremely long exposures (several minutes) can make moving pedestrians and cars invisible, turning busy streets or tourist spots into empty, quiet scenes.
· Transforming Motion into Serenity: Modern landscape photographers use long exposures to turn chaotic, crashing waves into a "silky," smooth mist and clouds into soft, streaking, or moody, ethereal textures.
· Creative Light Manipulation: It is fundamental to light painting, where photographers use handheld light sources to "draw" shapes or text in a dark environment.
· Astrophotography: Long exposure is essential for capturing faint starlight, turning the rotation of the Earth into star trails, or revealing the Milky Way.
· Subject Isolation: By turning dynamic, busy elements (like traffic or water) into abstract, blurred motion, the photographer can make static; architectural subjects stand out, creating a minimalist, artistic effect.
A Famous and Masterful Slow Shutter Speed Photographer
Born on February 23, 1948, the Japanese photographer Hiroshi Sugimoto currently divides his time between Tokyo and New York City, continuing to perfect his craft while dabbling in new ventures, such as architectural design.
All of Sugimoto’s series have distinct themes and similar attributes. Mainly using an 8 x 10 large-format camera, he specializes in a type of photography called “slow shutter speed” photography.
Born and raised in Japan, Sugimoto began taking photographs in high school. In 1972, he retrained himself as an artist and received a BFA from the ArtCenter College of Design in Los Angeles, California. Two years later, Sugimoto moved to New York City to continue his photography career.
Sugimoto’s Signature Photographic Style
Sugimoto refers to his signature photographic style as “time exposed.” He plays with shutter speeds other photographers struggle to master. His goal with these experiments is, in part, to create time capsules of events and to reveal the paradoxes of time.
Photography exhibitions and galleries in London
The V&A photography collection is one of the largest and most important in the world, with more than 800,000 images by both classic and contemporary photographers.
Atlas Gallery is one of the capital's leading galleries for photography. The gallery specialises in classic and modern 20th-century vintage photography, photojournalism and fashion, and hosts around six exhibitions every year.
Hamiltons Gallery specialises in international photographers, representing sought-after masters such as Irving Penn and Helmut Newton.
Michael Hoppen Gallery displays vintage and contemporary black and white photography.
The technical side of light painting.
Light paintings are long exposure photographs. To be a truly effective light painter, you need to understand how the camera works and how to control different parts of what photographers call the exposure triangle: shutter speed, aperture and ISO.


I also tried to take a long exposure picture of Blueprint and Manifestation. I don't think those pictures turned out good, because the background is too blurry and if I could put my camera on something or on tripod, that would be easier for me to get a clearer image. Next time, to get a clearer image, I could put my camera on something, for example – a chair and a table. But if I’m outside it would be a good idea to lean on something, for example – a wall, tree, etc.
Also, taking pictures in that location gave me more ideas and understanding of how it works. I had to change my settings on my camera sometimes, because of the different lights around you, some of them were brighter or duller. I also got more ideas of where I could go and take more slow shutter speed pictures. I have experienced long exposure and I’m happy with the pictures I got, but some of them are not really good and to change that, I can try editing them, changing exposure, color or adding filters.
Genetic data from research into the TLR7 gene by Professor Christian Hedrich’s team is mapped onto the sculpture’s lighting, driving shifts in colour, rhythm and intensity. Composer Ed Carter sonifies the same dataset, making normally invisible biological structures both seen and heard.
Uniting art, science and motion in a single gesture, here, the double helix is reimagined as something both familiar and otherworldly, as if we are briefly seeing the hidden patterns of the body in an imagined landscape — like a half-remembered dream.
-This audio-visual composition plays out across a 12m arc, wrapping the audience in an enchanting narrative. Inspired by Victorian Britain’s fascination with spiritualism, magic and the idea of summoning spirits, the laser generated animation morphs between abstract shapes and ghostly figures. Loosely based on ‘Thought Forms’ a 1905 book by spiritualist Anne Besant, who believed abstract visual forms could be linked to sounds or spiritual states, this piece delves back into the early dawn of ‘Visual Music’ shows, and their roots in seances and magic.


I did my google form for my classmates and friends of mine to answer questions about long exposure photography. On the first two questions, some people have experience in doing that type of photography, which shows that they practiced. People prefer taking pictures of the city or traffic, and I think it is because of different lights and motion outside. And it also gave me an idea to take pictures of the city and what's going around, because most of the people voted for that.
More than a half don't own a tripod, which makes it harder to capture a clear picture, especially when doing long exposure. Even though, those people don't have a tripod, it is possible to get a clear image even for slow shutter speed pictures, because I don't own one as well.
The DSLR camera was chosen by many people as the equipment they would use, and in my opinion, it is the best option because this camera gives you so much more opportunity in changing settings and also there is better quality, but a phone can be used as well and if you want to have something more compact.
Top 5 Long Exposure Locations in London
1. The London Eye from The Golden Jubilee Bridge

The London Eye itself is probably the best landmark in London to capture Long Exposure photography as the spinning wheel adds a great sense of motion and interest in the sky, especially when the sky is clear as in the photo here. There are a handful of great locations to capture the London eye such as from Westminster Bridge in the distance, directly from the front or behind the wheel but for long exposure compositions, this is my favourite.
Getting Here:
The nearest tube station is Embankment which is along the Circle and District lines. When exiting the station, head towards the riverside and under Hungerford Bridge and up the stairs onto the southern Golden Jubilee Bridge.
When to Visit:
The London Eye itself faces west so straight at the setting sun. This means during golden hour and sunset, you can get some great light. You can still get some great shots of the London Eye at sunrise, but I find it best to avoid the months Between September and March as the sun rises behind the London Eye which can cause issues getting a correctly exposed image.
2. Westminster from Waterloo Bridge

Usually, there’s a lot going on in this composition. With the rough waters, the London Eye, people walking across the Golden Jubilee Bridge and along the Southbank, it’s hard to pick out the main focus points in the composition. By capturing the scene as a long exposure, some of these elements are removed from the composition leaving the rest of the image some room to breathe.
Getting Here:
There is a choice of tube stations for this location. Waterloo which is on the Jubilee Line, or you have both Embankment or Temple to choose from on the Circle and District Lines.
To capture a good sunrise, the winter months are a great time to do so as the sun will light the scene from the left but I find the summer months the best time for capturing the evening light as the sun sets to the right of the scene, later in the evening meaning less river traffic to avoid in your photo and importantly, less people crossing the bridge as the path is a bit tight for space, leaving little room to set up the tripod safely.
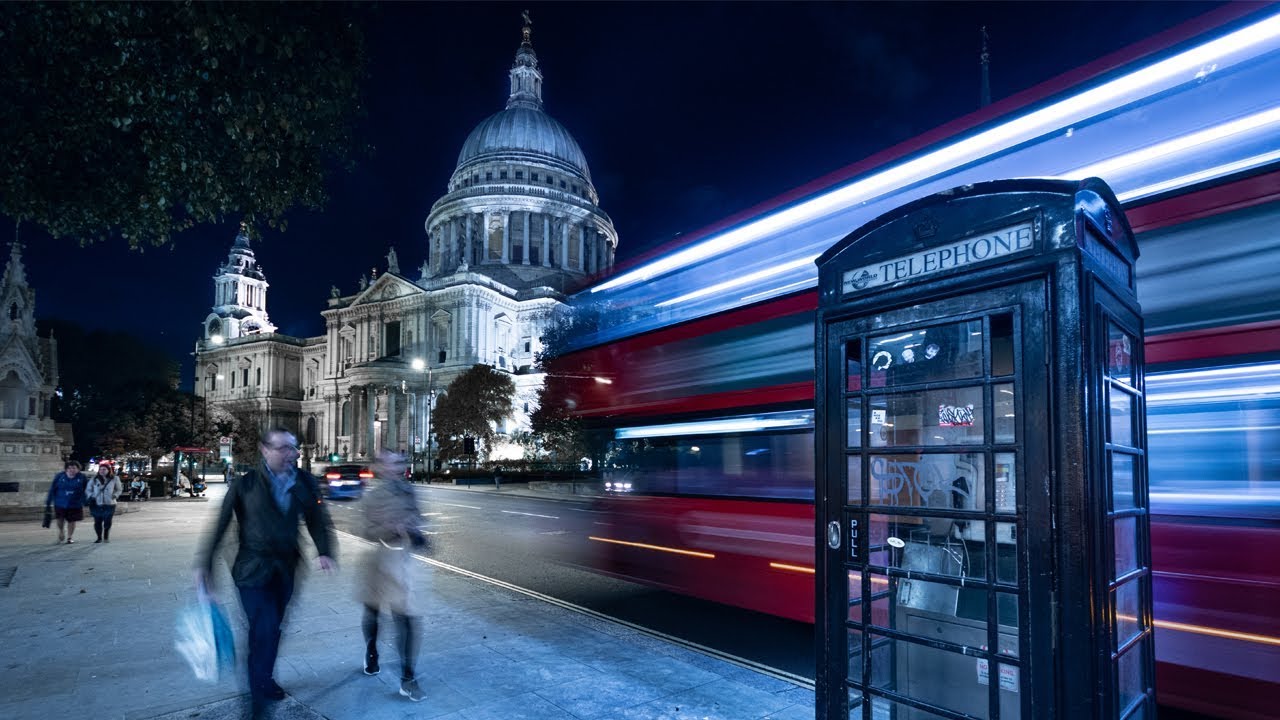
3. St Paul’s Cathedral and the Millennium Bridge

Continuing east along the river, the composition here is an incredibly popular one for good reason. The Millennium Bridge creates fantastic lead-in lines towards the world-famous St Paul’s Cathedral. The Millennium Bridge can be very busy at times and taking this photo with a standard exposure will capture all of those people compromising the strong, simple lines as you can see here but by using the long exposure technique, all of those people are rendered invisible in the final image simplifying the overall image.
Here you can see the same photo taken with a 1/40s exposure showing people crossing the Millennium Bridge.
Getting Here:
Getting here is also super easy as there are many local stations such as London Bridge for National Rail, Jubilee and Northern Lines which are all located south of the river or on the north side you have Mansion House for the Circle or District Lines. You also have St Paul’s on the Circle Line. Head towards Tate Modern and you will find the spot right by the river.
When To Visit:
Catching a good sunset or sunrise requires a bit of a late night or early morning as the summer months are best. From May to July, the sun rises in the north-east and sets in the northwest. Facing north to take the photo, the sun is close by when the best light hits the cathedral.
4. City Hall and the Shard from Tower Bridge

Looking west from Tower Bridge provides some great views of The Shard along with the striking architecture of More London and City Hall. Although they belong to different estates, the modern architecture of More London and The Shard complement each other nicely.
This view is another example of how using long exposure removes some of the distractions in an ordinary busy scene to add calm and focus on the main subject. With the smooth water and softer clouds, the hard-chiselled lines such as those belonging to the Shard are enhanced, leaving no doubt as to the main focal point in the composition.
Getting Here:
By far the easiest way to get to Tower Bridge is to take the short walk from either London Bridge (Jubilee Line, Northern Line or National Rail) or Tower Hill (Circle and District Lines).
When To Visit:
As with Waterloo Bridge, if you want to capture a cracking sunset with a little less people around, I think the summer months are best. The sun sets just off to the right lights up the architecture beautifully, and the later sunset means a little less foot traffic.
As for sunrise, the winter months provide the best chance of great light in the clouds above the buildings as in December and January, the sun rises just off to the right of the scene.
5. Tower Bridge from the Girl and the Dolphin Fountain

Bridges are arguably one of the most instantly recognisable structures in the world. The twin towers are a fantastic subject for a long exposure photo, and I think this location, with the fountain adding foreground interest, provides one of the best compositions of this iconic bridge.
Getting Here:
As with the location above, the easiest way to get to Tower Bridge is to arrive from either London Bridge (Jubilee Line, Northern Line or National Rail) or the now closer Tower Hill Station (Circle and District Lines). Once at Tower Bridge, the fountain is on the north side of the river right by to the stairs that lead to the bridge’s road level.
When To Visit:
I find the best light for a long exposure at sunrise or sunset and I find this location great for a sunset photo during the summer months. I’m not keen on having the sun set directly in the scene when taking long exposure photos as it creates too much contrast and can render the subject into a silhouette. Having the light come in from the side or front of the subject creates a more balanced exposure and when an epic sunset takes place just outside the frame, the best of the light is captured without fighting the dynamic range.
You may require a little patience when capturing this shot as this is the only location listed where people can literally walk in front of your camera. This is a popular spot for tourists capturing a look at Tower Bridge, usually standing for long enough to be rendered visible in your image, regardless of how long the exposure time is.
Moco Museum
The Moco Museum (Modern Contemporary Museum) is an independent art museum with locations in Amsterdam, Barcelona, and London, dedicated to exhibiting modern and contemporary art. The museum was founded with the mission of attracting broader and younger audiences and making art accessible to the public.
Moco Museum in Amsterdam
Moco Museum in Amsterdam opened in 2016 on Museumplein, in the historic Villa Alsberg, a townhouse designed in 1904 by Eduard Cuypers, the nephew of Pierre Cuypers, designer of Amsterdam Central Station and the Rijksmuseum. The townhouse was one of the first privately owned residencies in Museumplein and remained so until 1939.
History and concept
The museum was founded in 2016 by Kim Logchies-Prins and Lionel Logchies as an independent initiative aiming “to make modern and contemporary art more accessible to a wider audience beyond traditional collectors and institutions”.
Early collections and programming focused on popular modern and contemporary figures and street art, aiming to reach broader audiences through accessible exhibitions, and included works by artists such as Banksy and Andy Warhol. Commentators have described the museum as part of a broader shift towards privately funded art spaces that combine high-profile popular culture with contemporary art collections, including digital and immersive works.
Building
The Moco Museum Amsterdam is located in Villa Alsberg on Honthorststraat 20 in Amsterdam. Designed in 1904 by Eduard Cuypers, it was originally built for banker Siegmund Alsberg and remained the first privately owned residence on the Museumplein until 1939. The interior has been adapted for gallery use, including spaces for immersive and digital installations.


My pictures from Moco museum


In the Moco museum I really liked every exhibition that I saw and took pictures of what I found interesting. Some of the pictures that I took are not related to slow shutter speed at all, but when I saw different colour lights that are moving, which is perfect for me to experiment with slow shutter speed. Because I didn't have a tripod, it was a bit challenging for me to take a clear image to get a background that's not blurry.
But it kind of reminds me of Shutter-drag, a technique when you move a camera in a different direction when pressing the shutter button. It's when the moving background and one person or more are blurred, which creates dreamy effects by capturing ambient light and movement.
My favorite exhibit that I saw was the Krista Kim Heart Space, because of the movements of different colors lines, which looks like a heartbeat.
Heart Space (2024) by Krista Kim transforms each visitor’s heartbeat into living waves of colour, frequency, and light. Developed in collaboration with ethical-AI firm Tenbeo, the immersive installation captures participants’ real-time ECG data into a shared sensory experience. Within a mirrored space that reflects both self and others, individual heartbeats merge into one digital canvas, reminding us that even in a world of digital overload we remain deeply connected.
Shutter-drag
What is Shutter Dragging?
Shutter dragging (also called slow shutter sync) is when you use a slower shutter speed while incorporating flash. The result? A mix of crisp subjects (thanks to the flash) and motion blur in the background, making your images feel more dynamic and alive.
How to Use Shutter Dragging
Shutter Speed: Start around 1/10 to 1/30 sec—this gives enough motion blur without losing control.
Aperture: Keep it balanced depending on the ambient light (f/2.8–f/5.6 is usually a good range).
ISO: Adjust to ensure the background is properly exposed without overpowering the flash.
Flash Power: Use a lower power setting (like 1/32 or 1/64) so it doesn’t overpower the ambient light.
Rear curtain sync tells your flash to fire at the end of the exposure instead of the beginning. This ensures the motion blur happens before the subject is frozen by the flash, creating a more natural, flowing effect.
Step 3: Add MotionOnce your settings are dialed in, it’s time to experiment! Try:
Camera Movement: Slightly moving your camera during exposure can create artistic light streaks.
Subject Movement: Have your couple spin, dance, or move naturally to emphasize the effect.
Zoom Pulling: Slowly zooming in or out while dragging the shutter can add a fun, warped effect to your images.
When to Use Shutter Dragging
Shutter dragging works best in low-light situations where there are strong ambient light sources, like:
The dance floor with DJ lights
Sparklers or candlelit receptions
Neon signs or city lights during night portraits
Pro Tips for Perfecting the Look
Use a Wider Lens: This technique works best when capturing more of the scene.
Keep a Steady Hand: A little movement is great, but too much can make the whole image unrecognizable.
Test and Adjust: Every reception space is different—play with your settings until you find the sweet spot.


I really like the smudged effect and the mix of different colours on both pictures. On the first picture, the whole photo is blurry, and it looks like the camera was shaken while taking a picture, it also called shutter dragging which I already wrote about. Even though the picture looks a bit dark, the lights from buildings lights up the picture, and because it's all smudged it makes it look like it's lighter.
On the second picture, the main character was still, but I think led lights were used to make that moving effect. I also really like how this girl has different lights on her body such as green and blue, which makes her stand out.
Bibliography:
Reference: “Beginner’s Guide to Light Painting | Adobe.” Www.adobe.com, www.adobe.com/uk/creativecloud/photography/discover/light-painting-photography.html. Accessed 28 Jan. 2026.
Reference: “Don’t Rush Anything. When the Time Is Right, It’ll Happen. -Explored-.” Flickr, Don’t rush anything. When the time is right, it’ll happen.… | Flickr, 28 Jan. 2026, www.flickr.com/photos/marco18678/21570660329/in/photostream/. Accessed 28 Jan. 2026.
Reference: grants, et al. “Photography Galleries and Exhibitions in London.” Visitlondon.com, www.visitlondon.com/things-to-do/sightseeing/london-attraction/gallery/photography-galleries. Accessed 10 Feb. 2026.
Reference: “Heart Space by Krista Kim: Digital Art | Moco Museum.” Moco Museum, 27 Jan. 2026, www.mocomuseum.com/exhibitions/london/krista-kim-heart-space/. Accessed 11 Feb. 2026.
Reference: “Long Exposure Photography.” Photography, 2024, vocal.media/photography/long-exposure-photography. Accessed 11 Feb. 2026.
Reference: Los, In. “California Wedding Photographer in Los Angeles.” California Wedding Photographer in Los Angeles, 13 Feb. 2025, www.nichilton.com/photo-education/how-to-shutter-drag-on-the-dance-floor. Accessed 11 Feb. 2026.
Reference: “Los Angeles | Columbus Editorial, Music, Commercial Photographer.” Nick Fancher, 5 Oct. 2021, www.nickfancher.com/blog/2021/10/5/bold-colors-and-shapes-with-ballet-dancer-kristie-latham. Accessed 11 Feb. 2026.
Reference: Redd.it, 2026, preview.redd.it/street-photos-with-slow-shutter-speed-v0-x9hopquox5eg1.jpg?width=640&crop=smart&auto=webp&s=3369a3ec52b36c49fe7d8ed82678041ddebb7e5a. Accessed 11 Feb. 2026.
Reference: Top, My. “Trevor Sherwin Photography.” Trevor Sherwin Photography, 20 May 2019, www.trevorsherwin.co.uk/blog/top-5-locations-to-take-long-exposure-photos-in-london. Accessed 27 Jan. 2026.
Reference: Wagner, Samuel. Midway Blue Hour. 5 Sept. 2015, www.flickr.com/photos/samwagnerphotography/21138069916. Accessed 27 Jan. 2026.
Reference: “Winter Lights.” Canary Wharf, 28 Jan. 2026, canarywharf.com/winter-lights/. Accessed 29 Jan. 2026.
Reference: “Moco Museum.” Wikipedia, Wikimedia Foundation, 5 Mar. 2025. Accessed 30 Jan. 2026.
Reference: Vasilev, Fedor. “Capture Long-Exposure Portraits. Great Technique for Fine-Art Photos.” Medium, 25 Oct. 2022, medium.com/@fedorvasilev/capture-long-exposure-portraits-great-technique-for-fine-art-photos-fe9e5312112c. Accessed 20 Jan. 2026.
Reference: “Portfolio | Fedor Vasilev Photographer in Vienna.” Photographer Fedor Vasilev, 18 Nov. 2025, www.phfedorvasilev.com/portfolio/. Accessed 20 Jan. 2026.
V&A photography collection

Having acquired photographs from as far back as 1852, the V&A photography collection is one of the largest and most important in the world, with more than 800,000 images by both classic and contemporary photographers. It's housed within the Victoria and Albert Museum, one of the top museums for art and design on the planet.
Where: South Kensington (Cromwell Road, SW7 2RL)
Atlas Gallery

Perched elegantly on a Marylebone street corner, Atlas Gallery is one of the capital's leading galleries for photography. The gallery specialises in classic and modern 20th-century vintage photography, photojournalism and fashion, and hosts around six exhibitions every year.
Where: Marylebone (49 Dorset Street, W1U 7NF)
Huxley-Parlour

In its former guise as Beetles+Huxley, this Mayfair gallery focused solely on photography in all its facets, from established masters to cutting-edge contemporary artists. Today, as Huxley-Parlour, the gallery showcases other mediums, but contemporary and modern photography remain at its heart.
Where: Mayfair (3-5 Swallow Street, W1B 4DE and 45 Maddox Street, W1S 2PE)
MMX Gallery
Based in New Cross, south-east London, MMX Gallery showcases works both by established and emerging talents, as well as giving new life to archived works. Its roster champions British and international photographers who use freedom of expression in their works.
Where: New Cross (448 New Cross Road, SE14 6TY)
Hamiltons Gallery

Equally as stylish as its neighbour The Connaught Hotel, Hamiltons Gallery specialises in international photographers, representing sought-after masters such as Irving Penn and Helmut Newton. But local heroes, such as London-born war photographer Sir Don McCullin, are also put under the spotlight.
Where: Mayfair (13 Carlos Place, W1K 2EU)
Michael Hoppen Gallery

A major presence in the international photography community, Chelsea's Michael Hoppen Gallery displays vintage and contemporary black and white photography. The aim? To emphasise the importance of photography in contemporary art today. Exhibitions feature both established and emerging artists.
Where: North Kensington (UNIT 10, Pall Mall Deposit, 124-128 Barlby Road, W10 6BL)


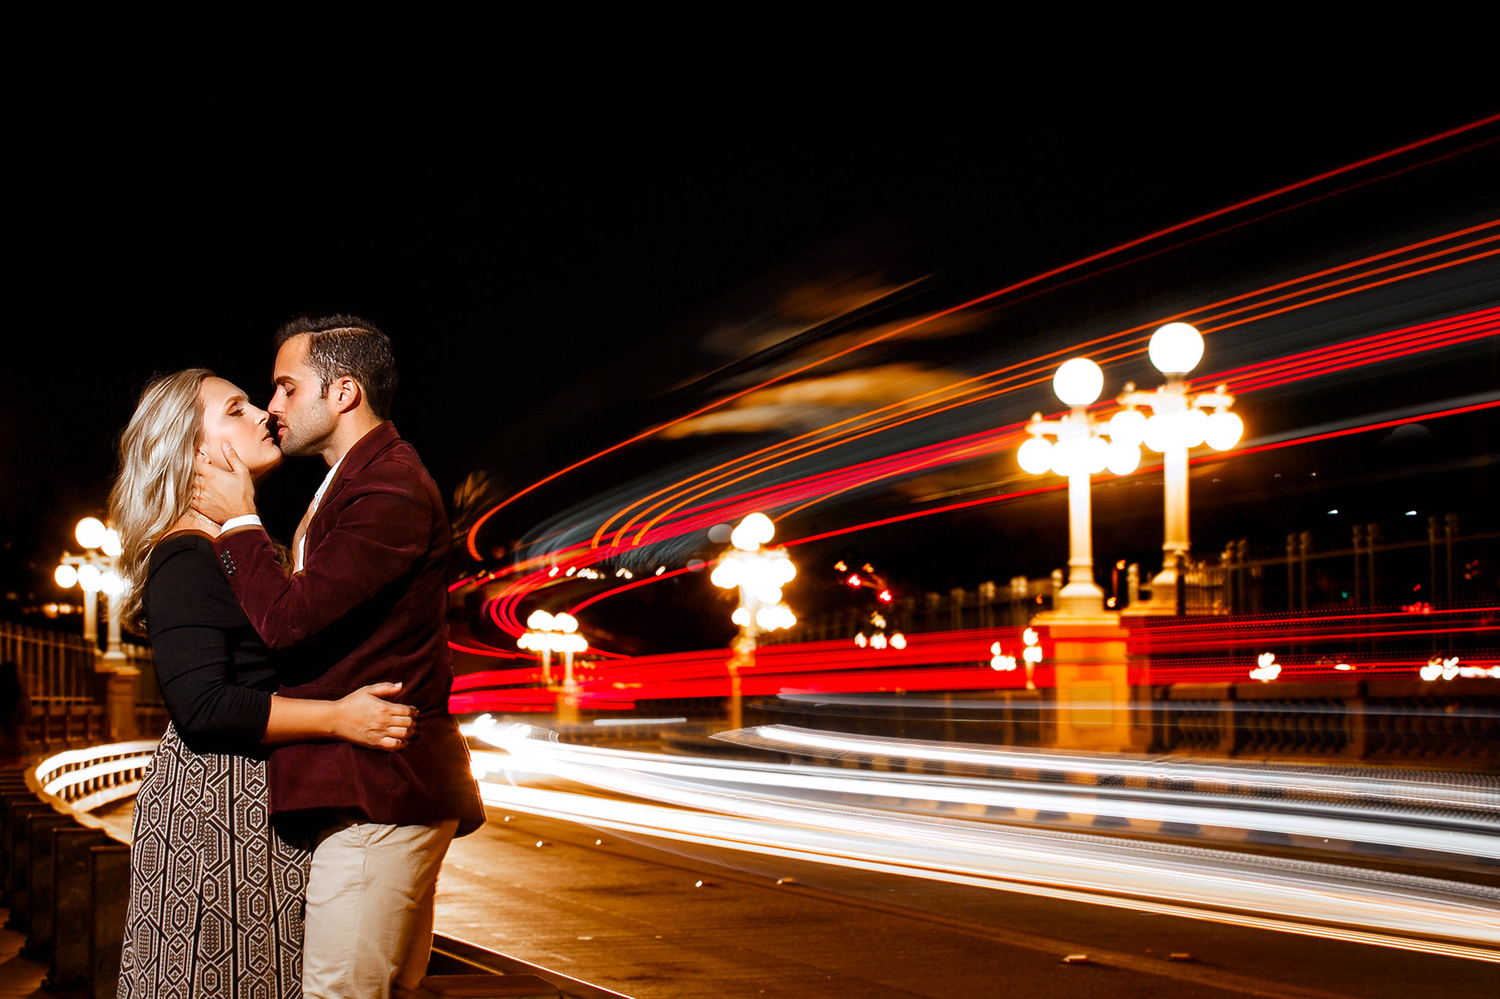
"Most people think blur is a mistake. I used it as a decision.
This shot was made using a shutter drag - showing the shutter to let motion paint the frame instead of freezing it. Light stretches. Time leaves a trace. Control becomes optional - and thats the beauty.
Not every frame needs to be sharp.
Some just need to feel free." - Jas

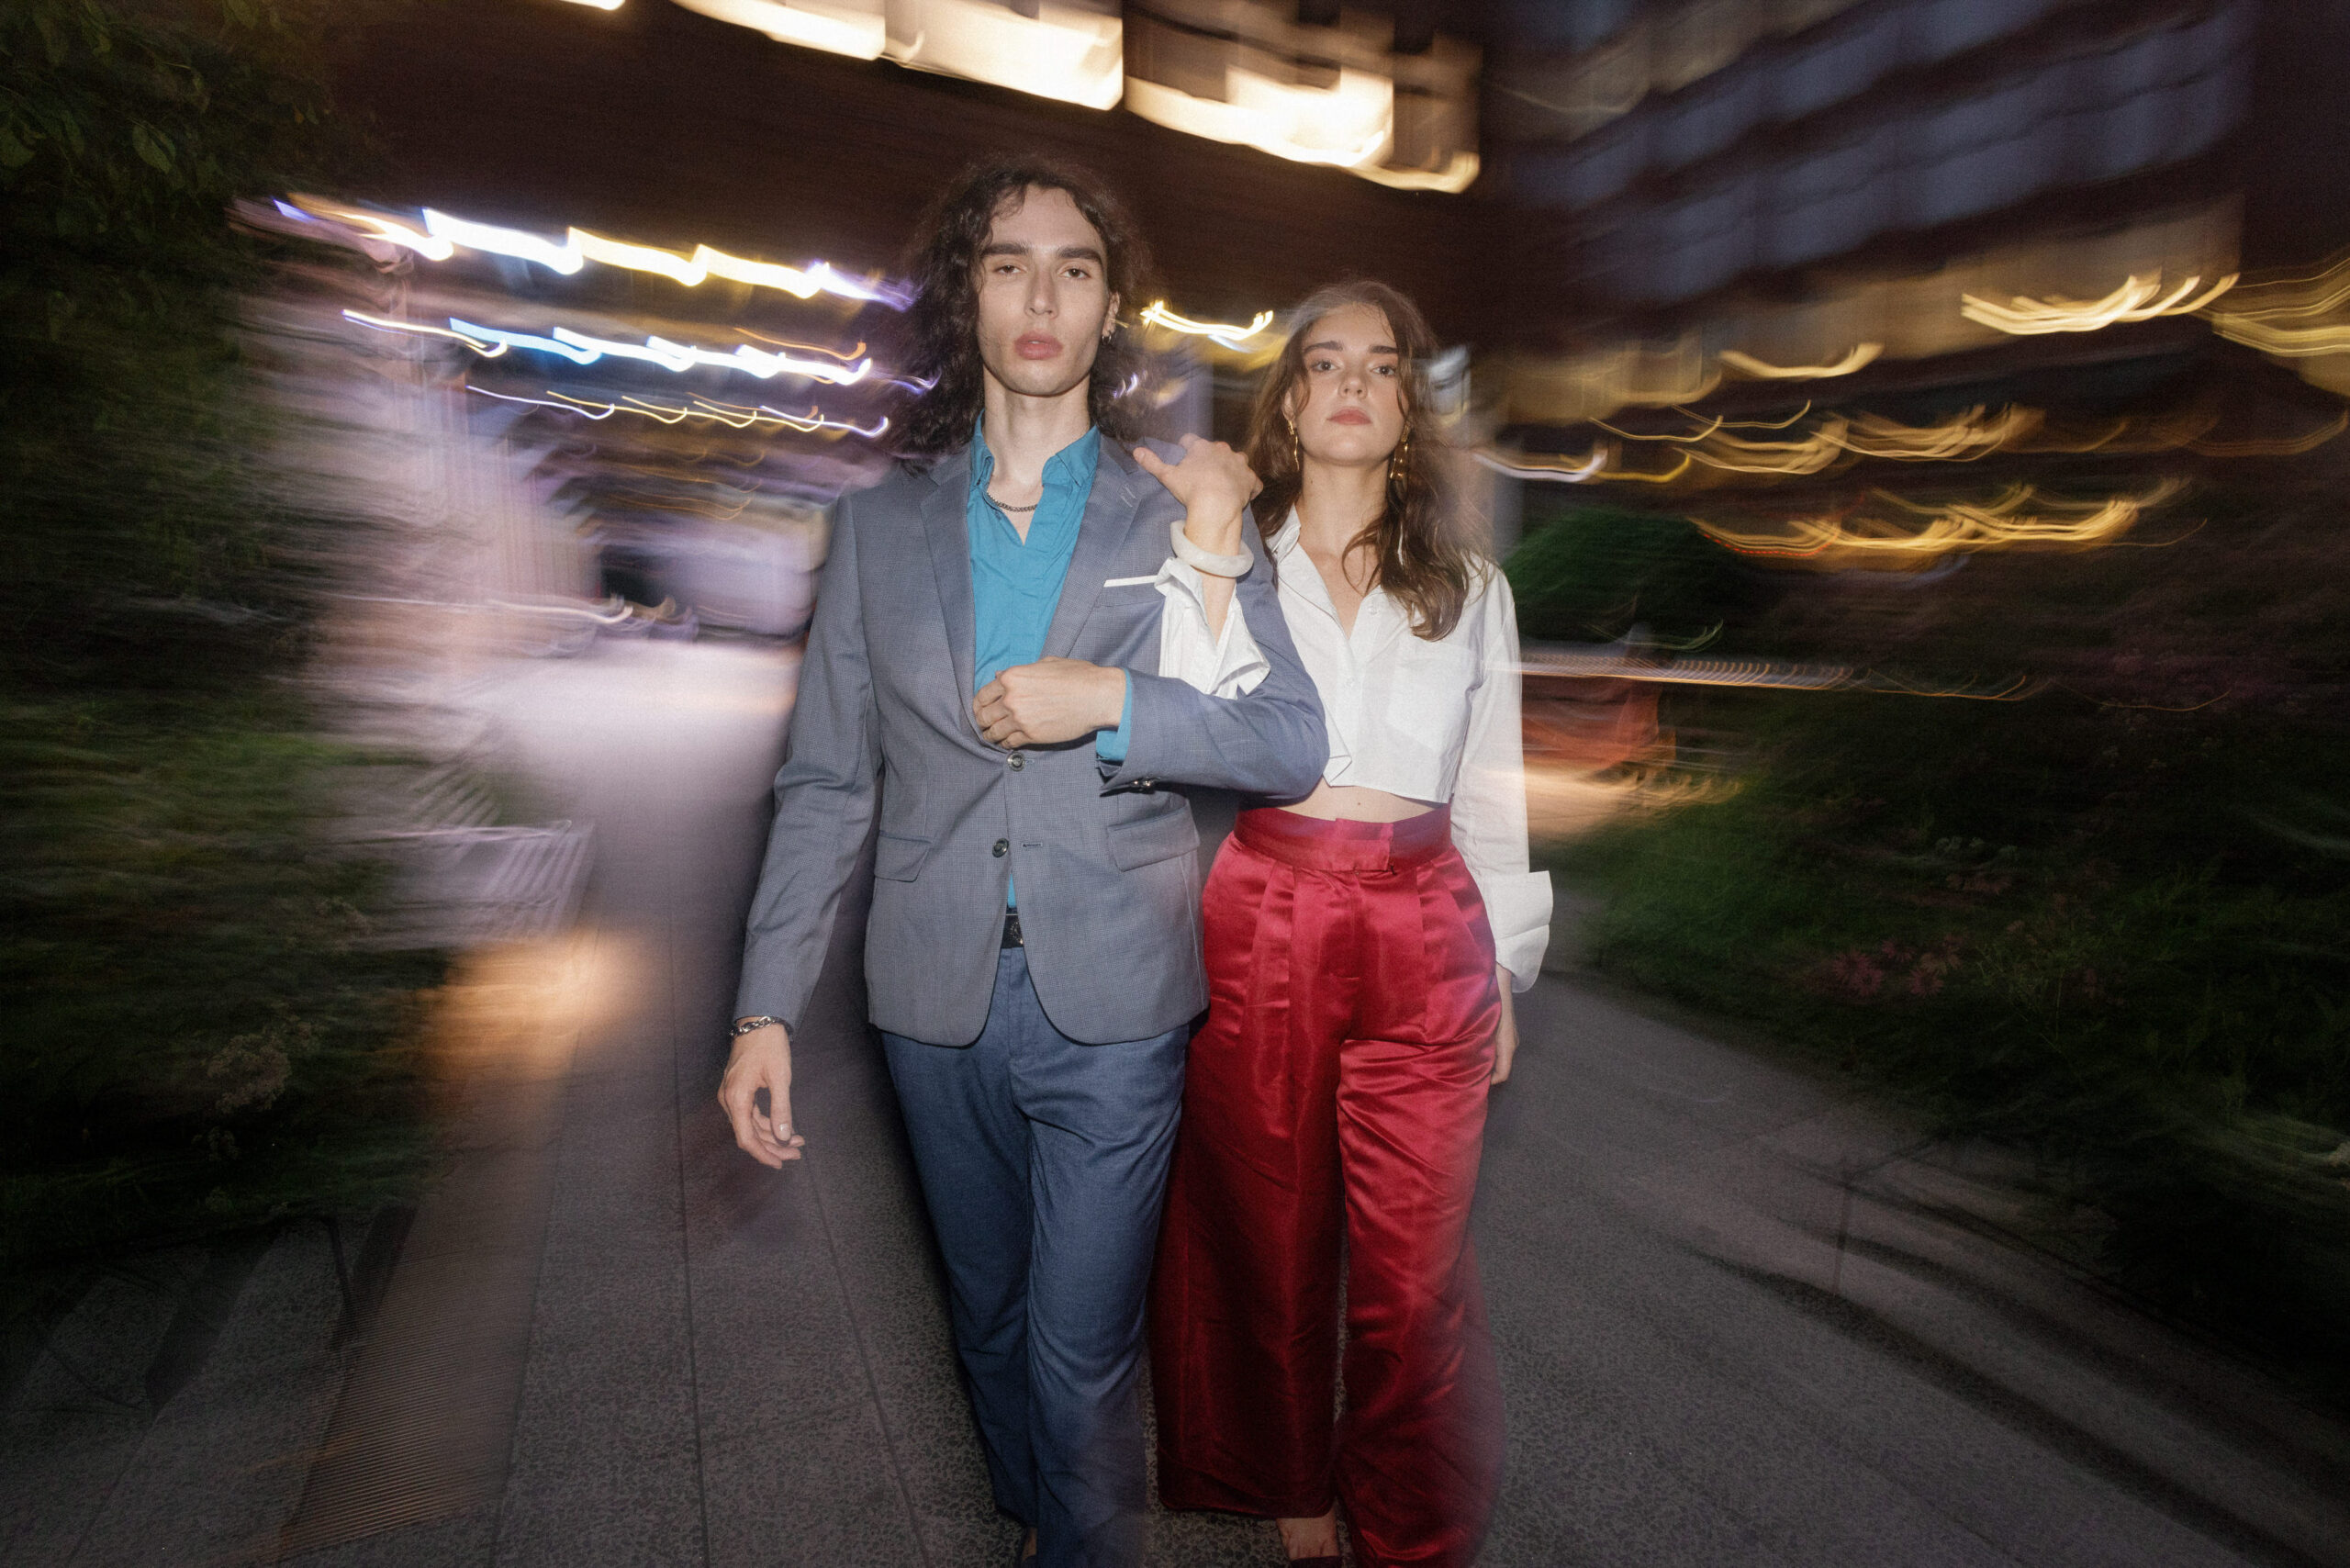
From Michael Wright's article I read about fashion and portrait photography in London using slow shutter speed technique.
-Equipment
-Model casting & fashion styling
-Building a team
-Location Scout
The location scout was extremely important for this shoot. I needed to find several locations where I could place my model in the foreground of my shot but have traffic rushing past in the background. I have good knowledge of the streets of London having lived and worked here for so long, but on the day of the location scout I realised that a number of locations I had in mind just wouldn’t work or be practical when scheduling the shoot day. I ended up deciding on three locations:
- Piccadilly Circus - I knew I would get a few different compositions of my model in the foreground and red London busses in the background.
- Hyde Park - The bridge over the serpentine river would be perfect for capturing taxis passing by, and well as having a great spot for a high angle image leaning over the bridge shooting down below.
- The National Theatre - Brutalist architecture and strong leading lines to compose a high angle of a concrete stairwell.
Cameras & Lenses
Of course, your camera and lens choice play a part in the image that you create. But I’m a big believer that you shouldn’t get too caught up in which camera & lens is better than another. It really depends on the scenario that you are shooting. A medium format camera is fantastic for shooting beauty in a studio, but not so practical for shooting on the streets of London.
Reflector
I needed a reflector to help me control the light on my model. The with white and silver materials was a great choice for this shoot. It’s incredibly portable, packing down into a tiny case that I can clip to my bag.
Lighting
1x battery powered strobe and umbrella: we didn’t end up using these, but you never know when you might need a strobe head, especially when the weather in London changes so quickly. It’s better to have kit and not use it rather than the other way around!
-Model Casting
I tend to work with model and talent agencies when casting a model for a shoot. Agencies will handle all the communication, rather than you having to going directly through the model.


The concept of this shoot was to use a slow shutter juxtaposing the busy, relentless pace of London rushing around my model looking calm, cool and composed standing still in time.
My shutter for all these shots is very slow; around 1/10th of a second. For context if I’m out on the streets shooting fashion or portraits in normal conditions my shutter would be upwards of 1/250th of a second. The slow shutter allows me to blur all the movement behind Matthew, as long as it’s moving quickly enough. Matthew had to keep really still, otherwise there would be blur on his face and body.
The shutter isn’t so slow that everything in the background is a complete blurry mess, I still wanted to capture enough detail so the viewer can clearly see what is happening behind Matthew. The busses and taxis in London are very iconic, and I wanted them to play a part in the overall ambience of my photos.
Architectural photography is all about scale, perspective and design.
One of my favourite locations to take pictures of interesting buildings is in the City of London. With a rich architectural history that reflects the fascinating social history of this area, it is full of architectural gems, both old and new. Especially when it comes to tall buildings and skyscrapers, the obvious perspective is to look up as in the shot above of the Lloyds building and its neighbours the Leadenhall Building and the Aviva Tower.

Gargoyle on the roof of a building, City of London

Dragon on top of a column in Leadenhall Market, City of London

HOW TO USE SHUTTER DRAG FOR WEDDING RECEPTION PHOTOS
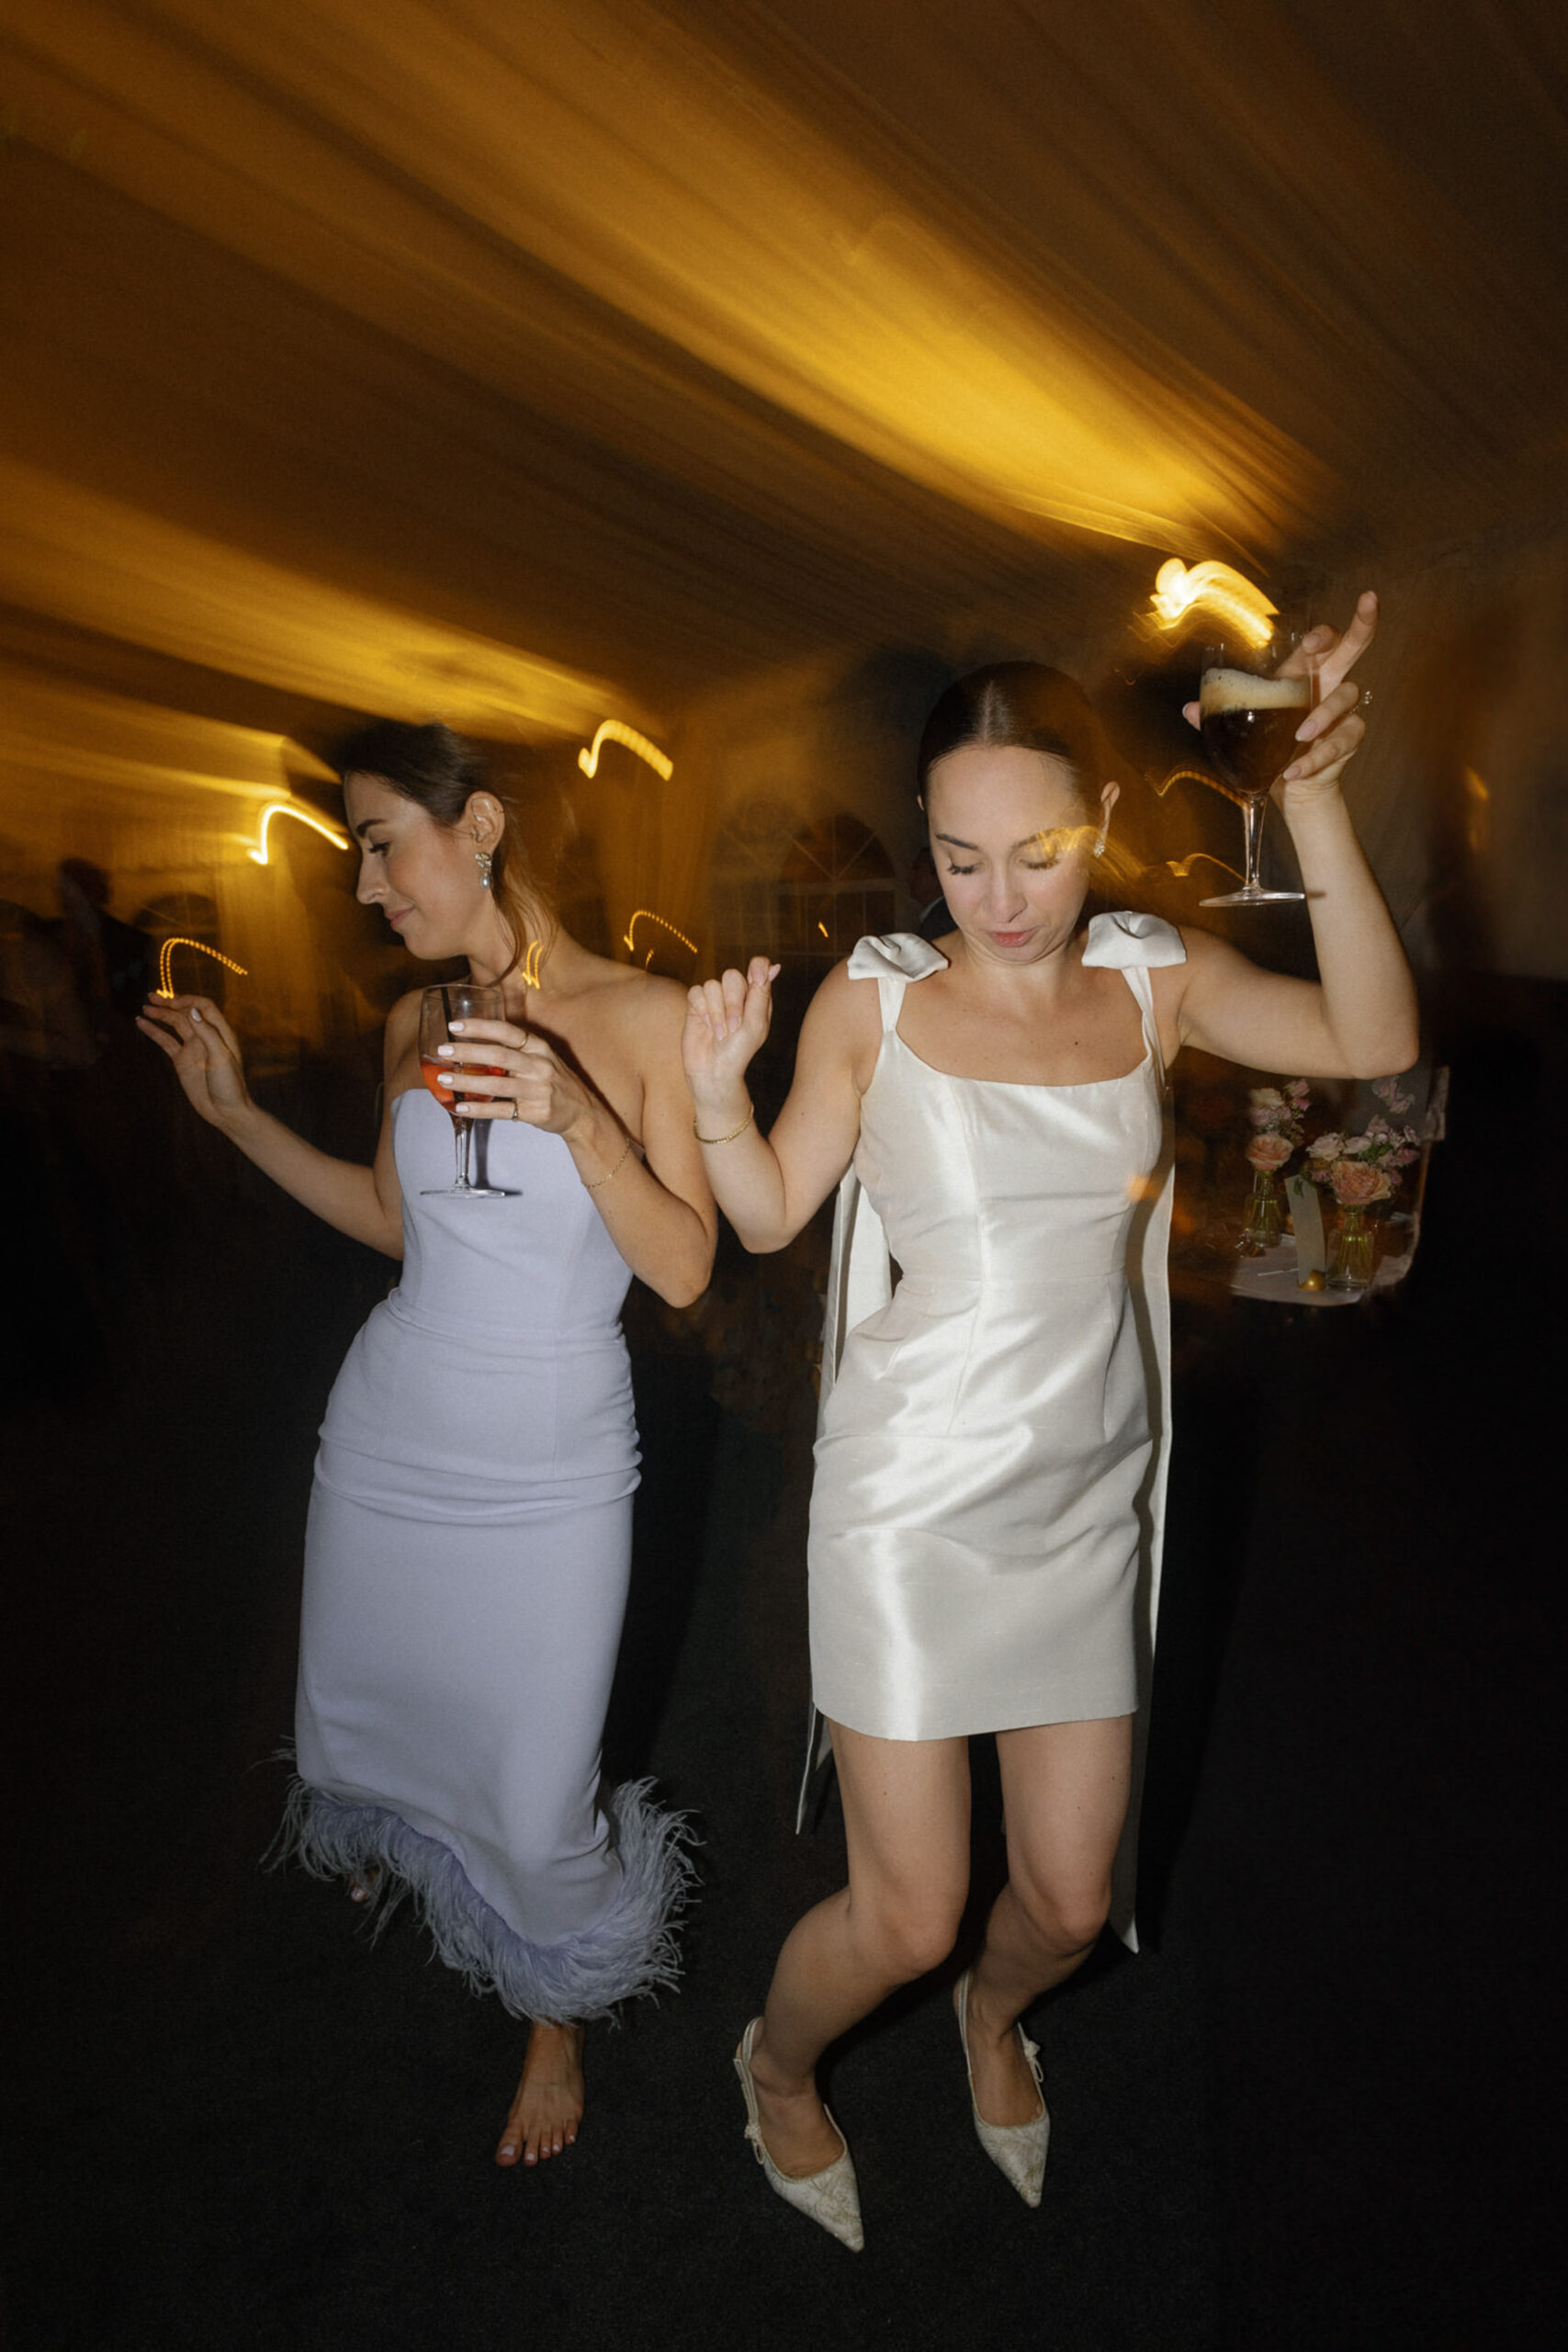
When I started photographing weddings, shutter drag (also known as motion blur) was a mystery. After all, most photographers don’t regularly photograph moving people in dark ballrooms. But I always liked the shutter drag look for open dancing. It adds a different dimension to reception images. You can add colorful swirls and consistently stop the action.
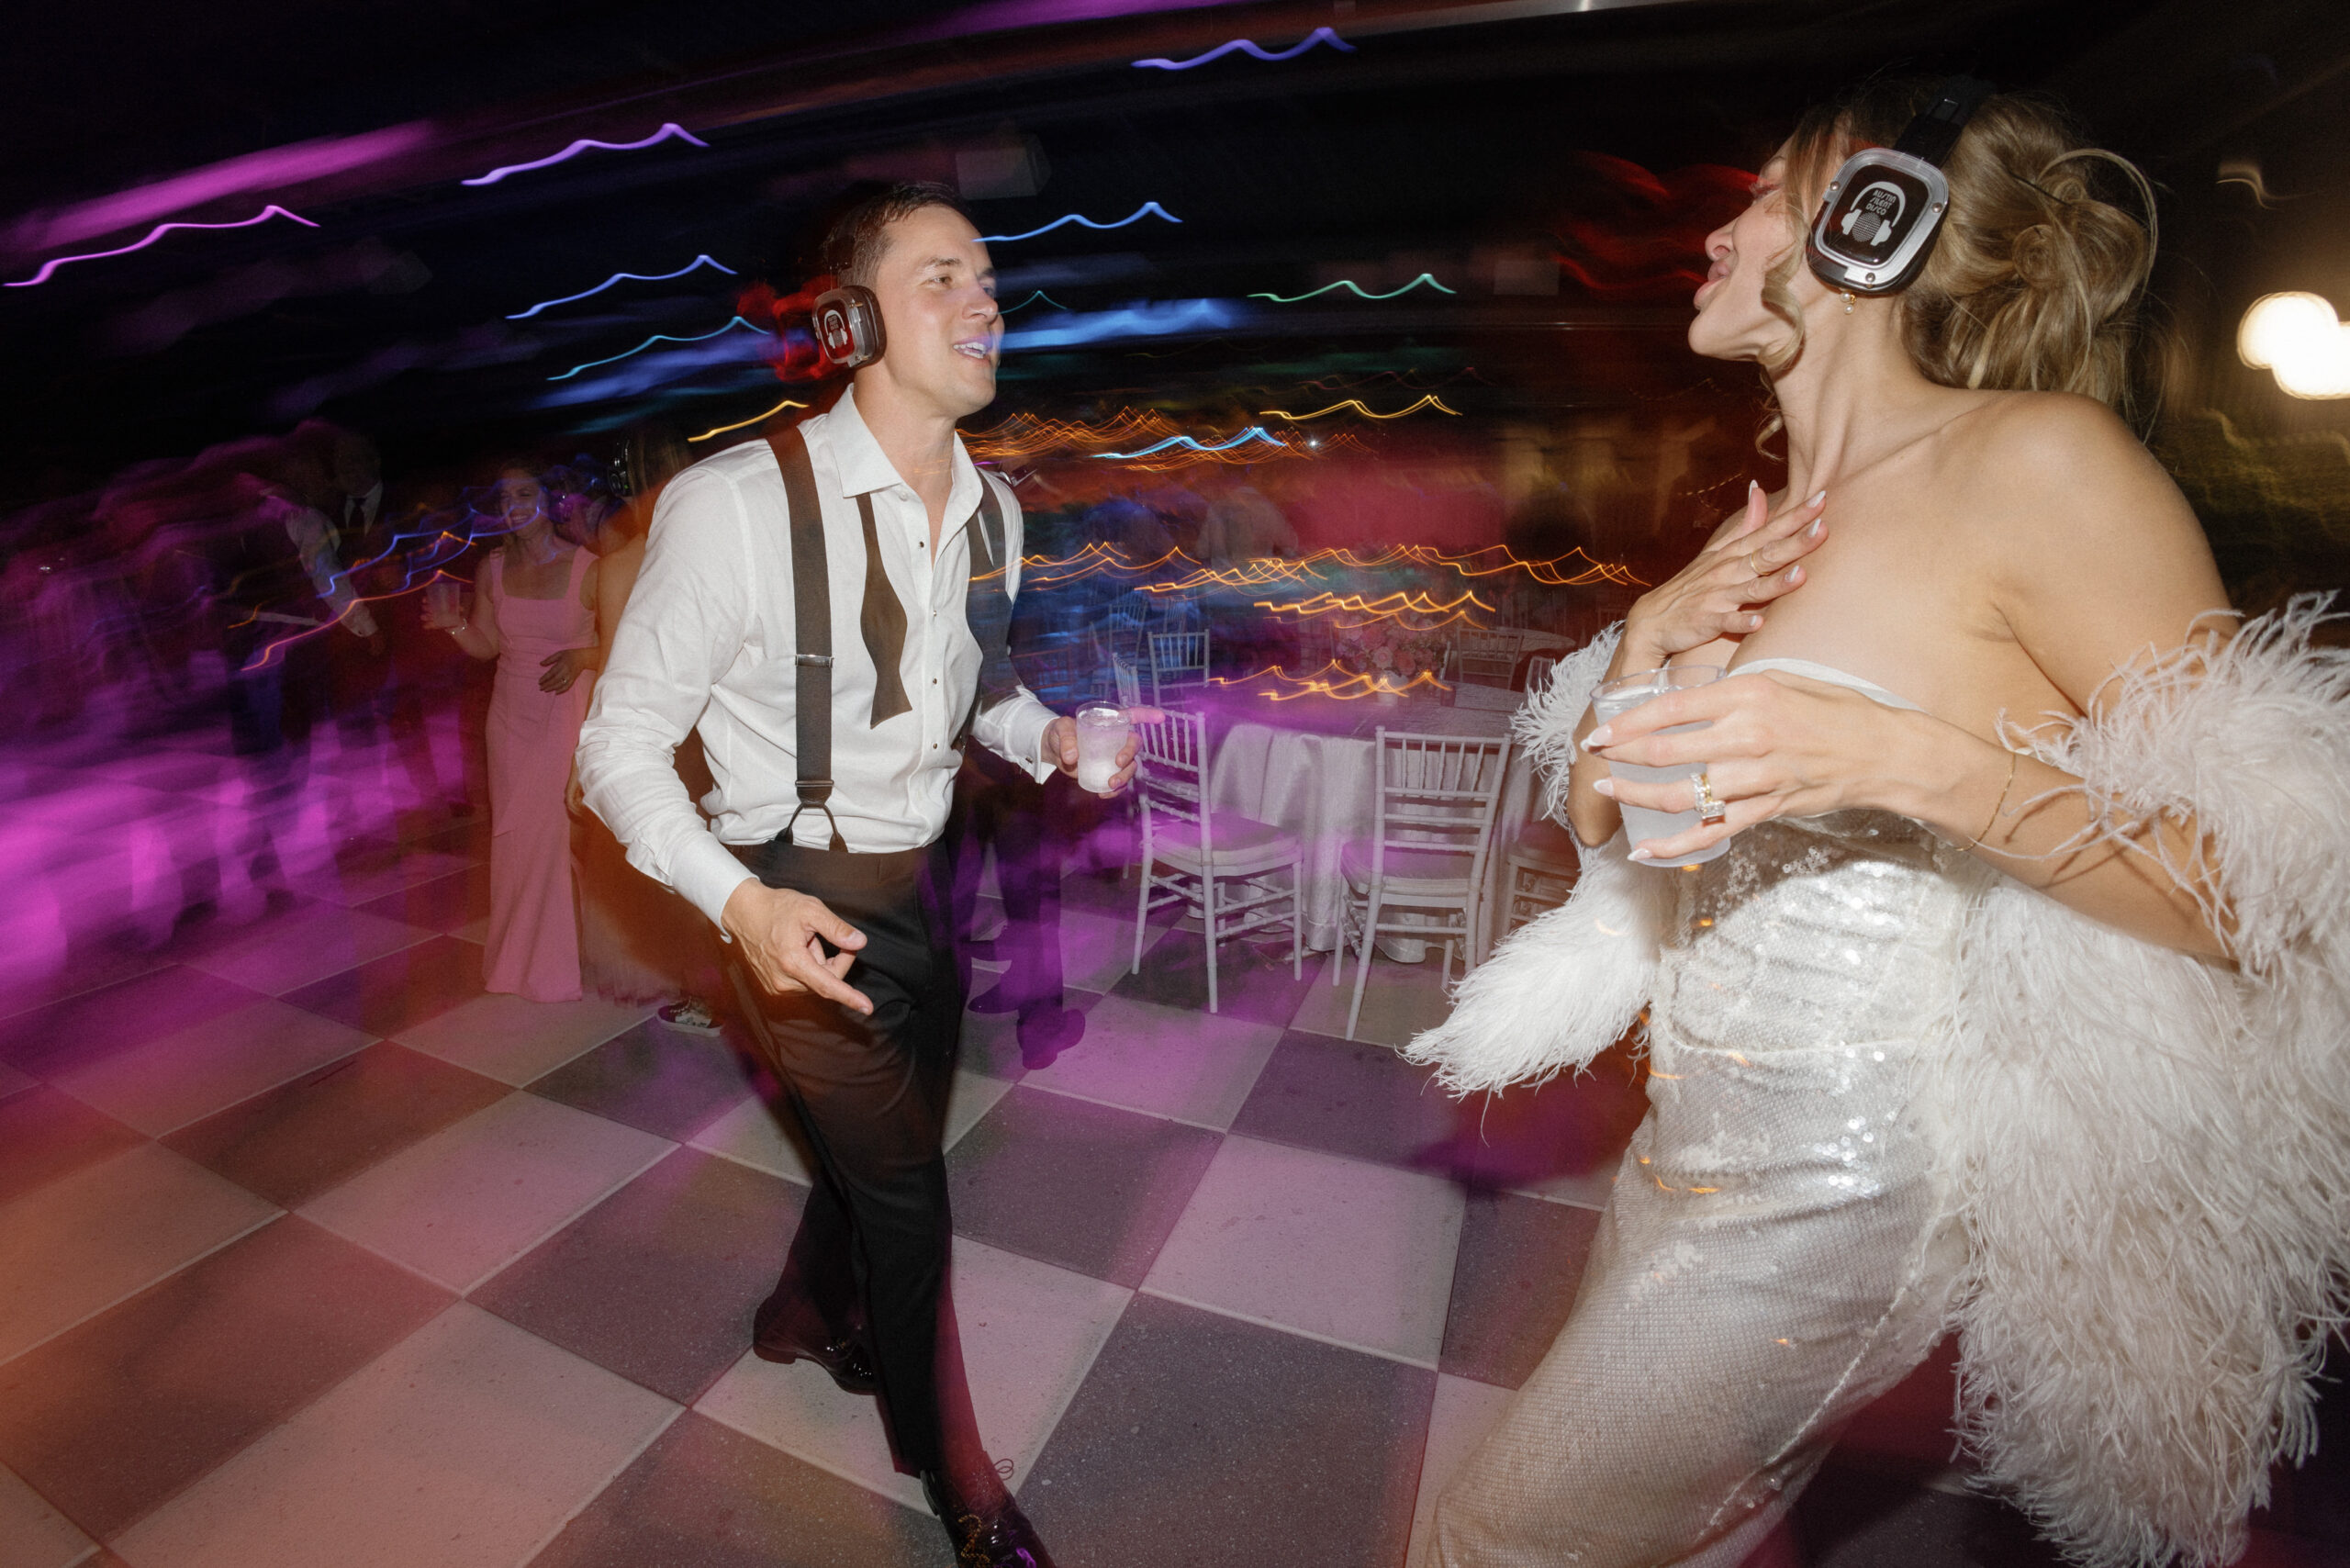
Shutter drag, also known as motion blur, can transform ordinary photos into vibrant, dynamic images. This technique adds a touch of whimsy and energy to your shots, perfectly capturing the festive atmosphere of a wedding dance floor. As a wedding photographer, mastering shutter drag can set your work apart and provide your clients with unique, memorable images.
What You’ll Need for Great Shutter Drag Photos
- A camera with manual setting options
- A flash with manual setting options
- Dark background, with a few brighter lights scattered throughout
When You’d Want to Use Shutter Drag for Wedding Receptions
I usually only use this technique when photographing open dance floor action. It can also work for things like a bouquet toss or reception exit. I never use it for “events” like the first dance, cake cutting, or toasts. For those moments, I like to use prettier off-camera flash that shows the uplighting, decor, and guests.
Why You’d Want to Use Shutter Drag for Reception Dancing Photos
The wedding dance floor is often a tipsy, sweaty blur. I like the photos to look the way things feel. Shooting this way also allows me to shoot fast. I hardly ever even look through the viewfinder when shooting this way. I point and click at what is happening. I can reach into a crowd or hold the camera over my head. No problem! Lastly, this look can make an otherwise drab or empty room look fun and full.
HOW I CREATE THE SHUTTER DRAG LOOK
I usually use a Canon R5 camera, Canon RF 16mm 2.8 lens, and a Godox V1 flash that’s attached to the camera’s hot shoe. I also register the settings for this technique under the custom functions (C1, C2, and C3) on the Mode Dial. You can get this same look with any camera setup. This is just what I’m using currently when shooting digital and not film.
- The flash is pointed straight ahead.
- I find this look works best with a 24mm or wider lens on a full-frame camera like the Canon R5. So I lock my 24-70mm lens at 24mm or better yet, use my nifty 16mm. I set my flash to 1st-curtain sync (can be set under the flash function settings in your camera menu).
While in manual mode, I start with these camera settings:
- Aperture: 7.1
- Shutter: 4
- ISO: 100
The larger aperture along with the wide lens keeps me from worrying much about missing focus. I can point the camera in the area of my subject and press the shutter button. Easy! The low ISO keeps any ambient light to a minimum. The slow shutter is what lets the bright lights in the background swirl around.
While in Manual mode on my flash, I start with these settings:
- Power: 1/16
- Zoom: 50mm
The power of the flash is something I’ll adjust as needed. This determines how close or far you need to be from your subject. The lower the flash output, the closer you need to be to your subject. That’s because the light from your flash is what your camera will be seeing in this mode. You won’t rely on any ambient light that may be present. 1/16th power is about the spot that I like to start at but it will vary based on how light or dark the room may be. Using ETTL usually works pretty well too. It’s a nice option when your subject is moving all over the place, like on a wedding reception dance floor.
Zooming the flash took me forever to figure out. This is super important because it gives the vignetted look to the image. The more the flash is zoomed, the more vignetted the image will be. I like the super vignetted look but you need to have your subject right in the middle of the frame. As I’ve said, I like to be able to just point the camera in a direction without looking through the viewfinder. Therefore, I opt for a wider vignette that is more forgiving if I have a face closer to the edge of the frame.
The pictures were shot all of the following with Canon R5 and 24-70mm 2.8 lens. The neutral density filter was used as well for some of the shots, because if you want to shoot on a bright, sunny day- for those new to photography, ND filters lessen the amount of light entering the lens, so you can use a longer shutter speed despite it being bright outside.
This technique can be shot on pretty much any camera- even iPhones have ways of taking long exposures through different apps or the Live photo settings.
I tend to shoot at 1/25 or below depending on the desired effect. Best way to learn how to do it? Get out there and experiment with it and paint the picture! - Maciej Lubomski


I did my research on shutter drag from Maciej Lubomski which gave me more ideas about possible location where I could take pictures, and I would like to try it, because you can use this technique even if you don't have a tripod, which will be easier for me, or you don't have to worry about if your background is blurry, because as you take a picture you need to move a camera to achieve the blurry effects. I really like this technique, because you can move your camera differently, for example, to the sides, up, down or rotate the camera as well.
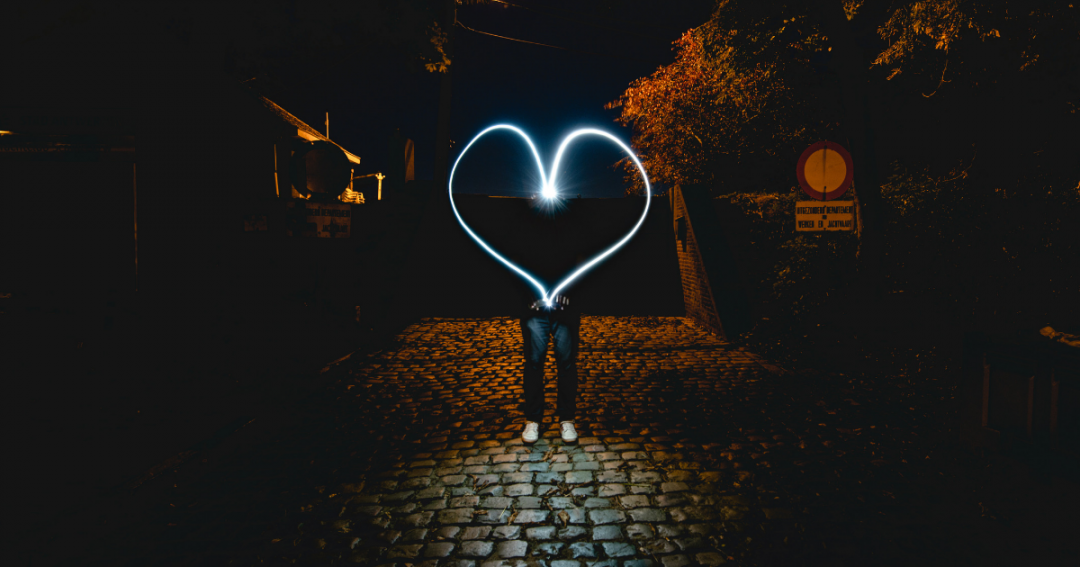
What do you need for light painting
First of all, you’ll need a light. Anything that gives of a decent amount of light and is mobile is good. Smartphone flashlight can be used as well. You can also use a pocket light, a lighter, or even a match. However, make sure you get a consistent and easy to maintain light source.
A camera with a long shutter speed option. If you have a DSLR, you certainly have an option for long shutter speeds. If you use a simpler camera it often has a night-function or light painting feature. These days, smartphone have these features too.
A tripod or sturdy underground helps you to maintain a steady shot. You want the light to move around, not your camera. So having a tripod for your camera or little tripod for your smartphone helps a lot.
Start with simple shapes
The best thing to do is start with a simple shape. Lines are great to check the intensity of the lights, but if you really want to get into shapes I recommend a heart.
With a light in each hand, it’s the easiest shape to create. Of course, you can also try triangles, squares, or circles.
Use two light sources
Having a light source in each hand can help you draw shapes easier. This way you can coordinate the starts and ends of your shapes better. This technique is how we got the perfect heart shape the easiest. Of course, this is not always the best solution, but it is one that can help you out a lot.
Work your way up to harder shapes

Use lights to fill in subjects


Subject Movement vs. Camera Movement
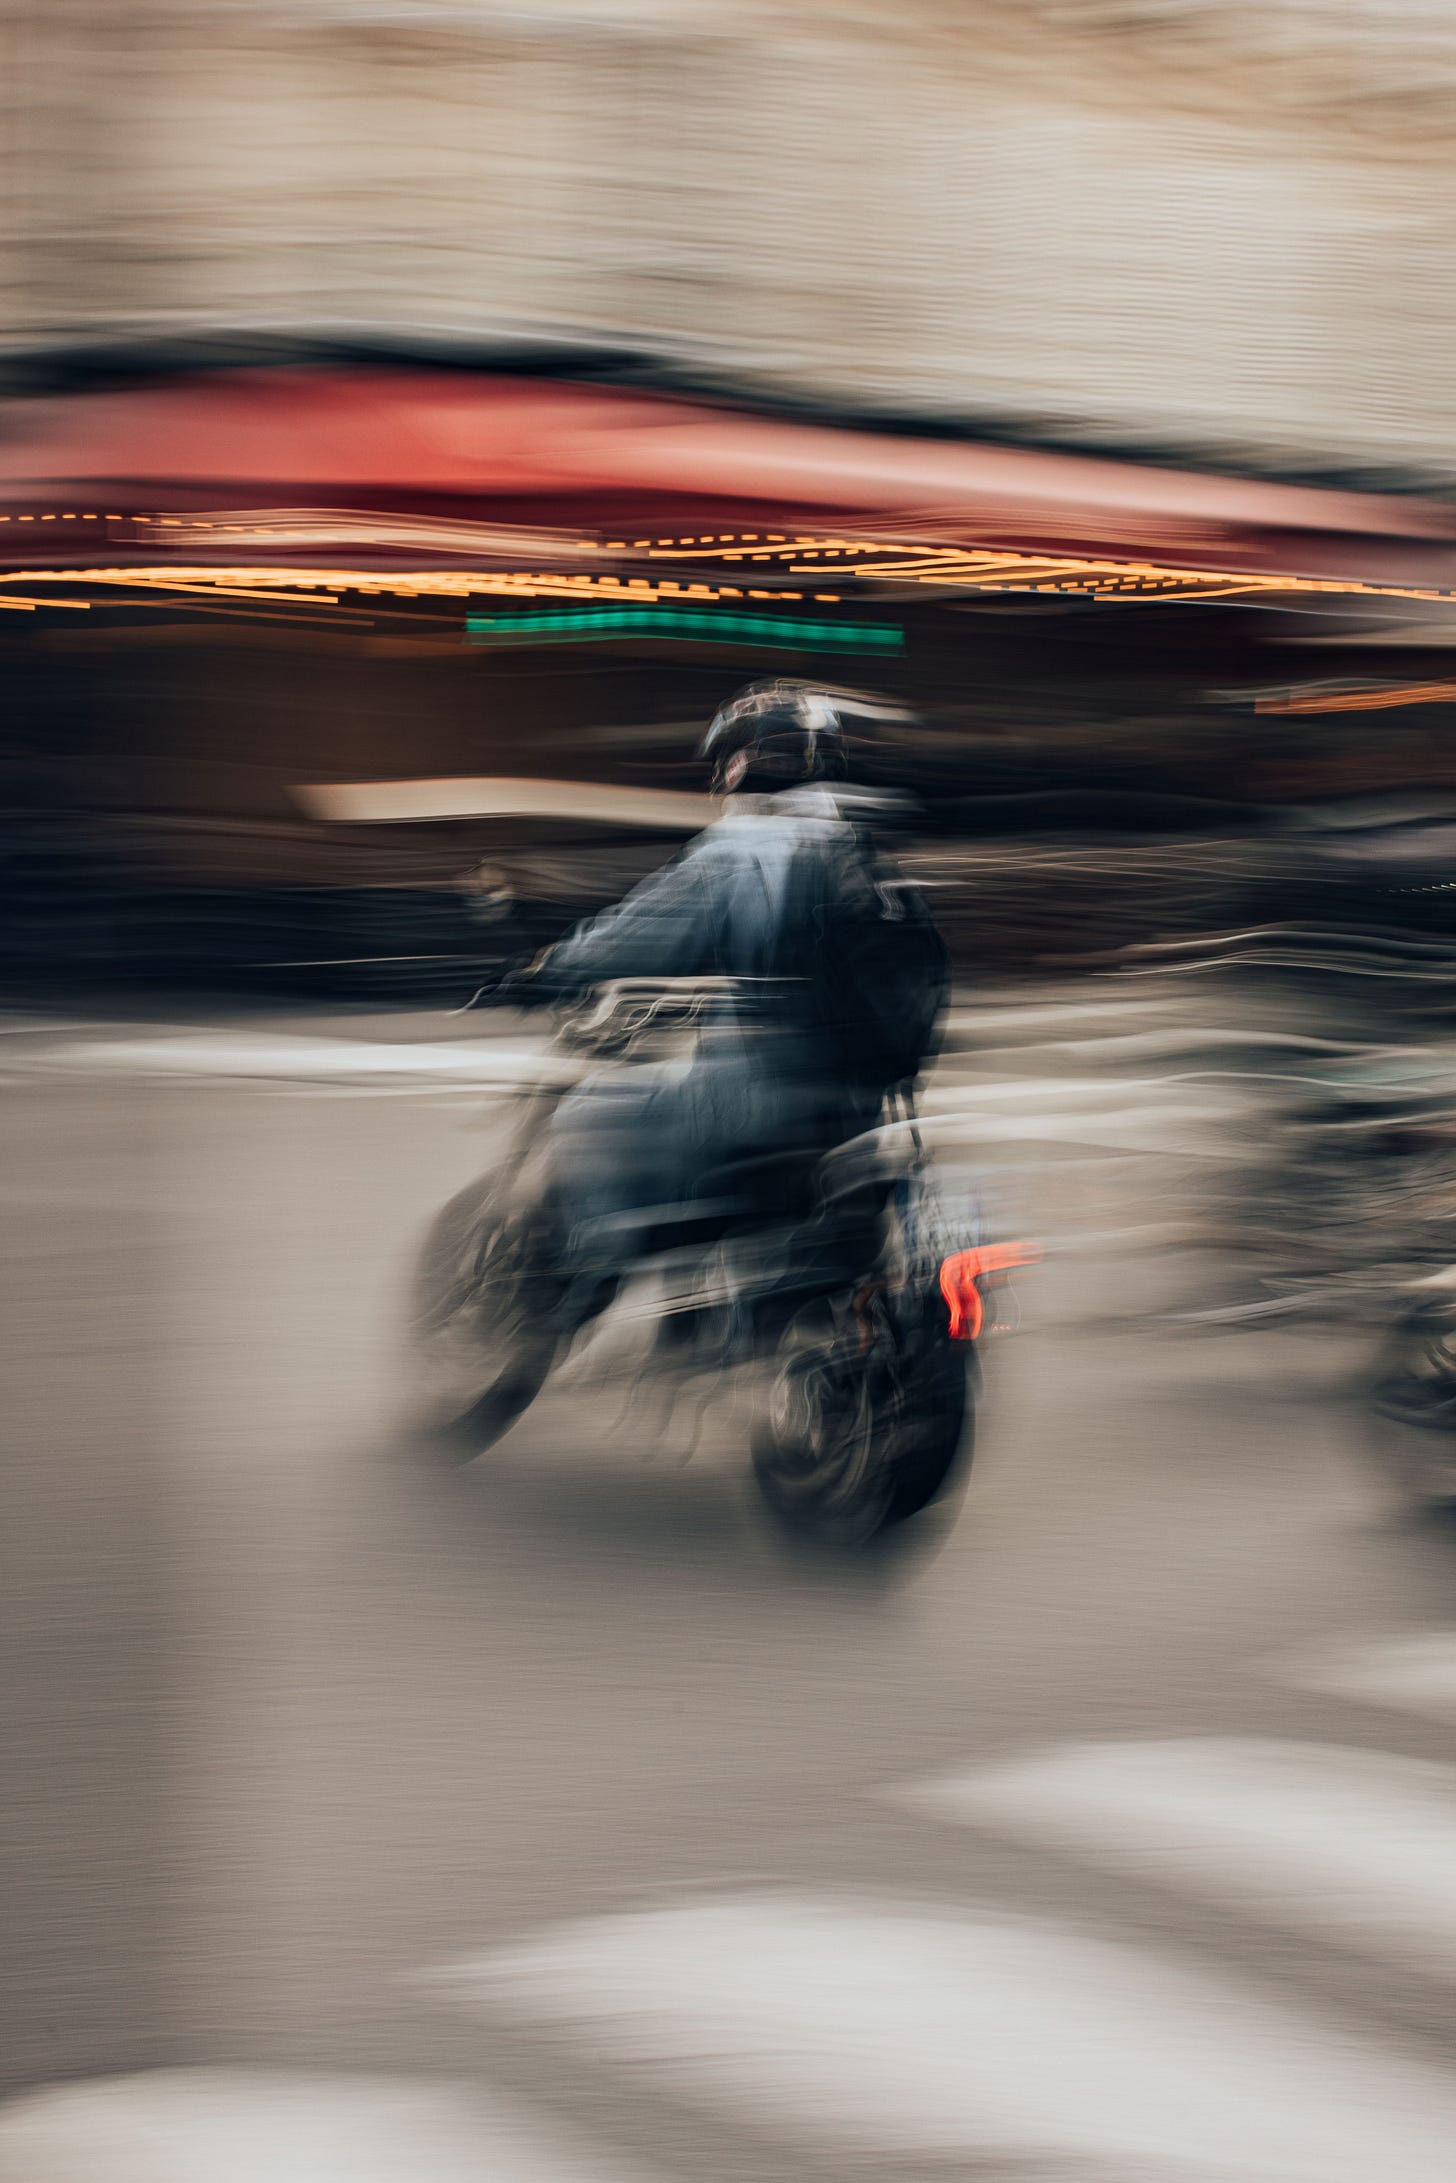
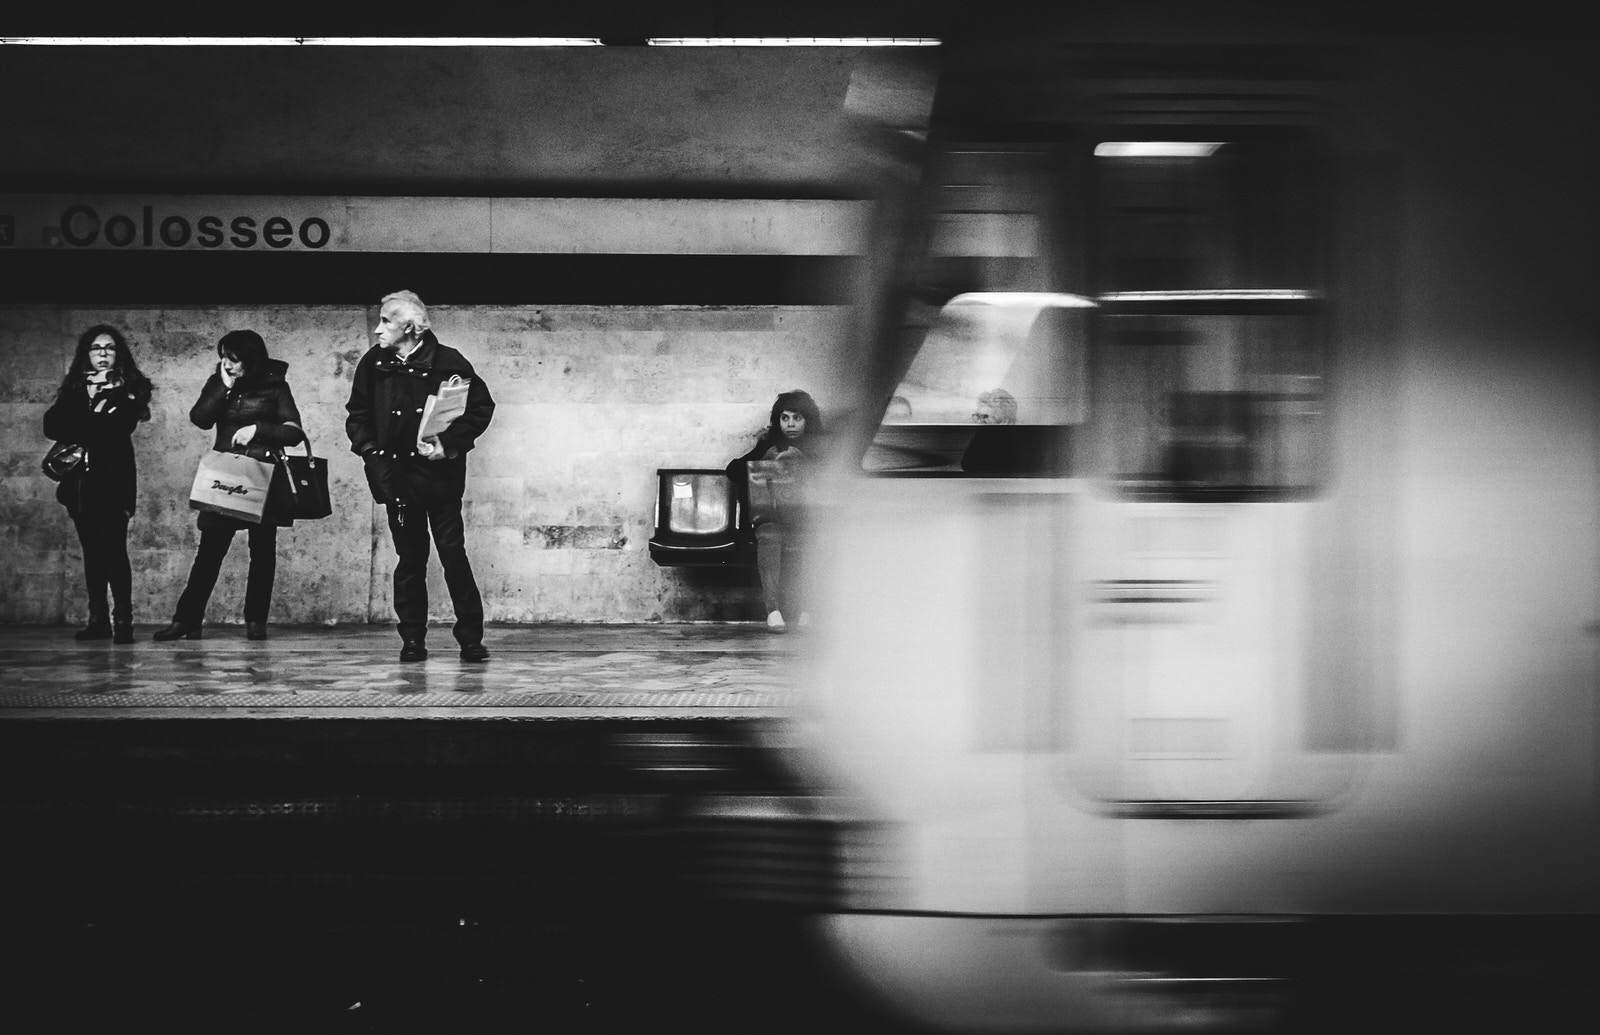
An important distinction between the types of blur you will get in a photo has to do with what is moving: the subject or the camera. With a camera secured to a tripod, it’s the subject’s movement that will create the blur streaks. Think of a night scene with car taillights streaking across the frame during a very long exposure. If you move the camera while set to a slow shutter speed, everything will be blurry.
The slower the shutter speed and the more movement of the camera, the blurrier the image will be.
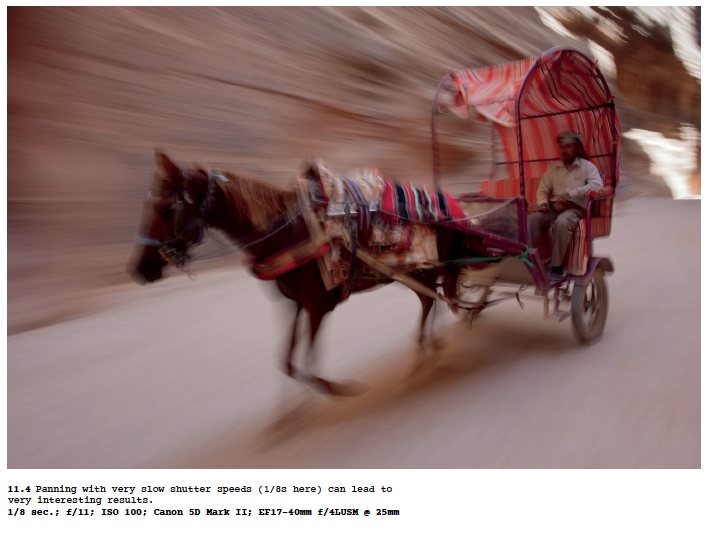
Panning
If you move the camera to follow a moving subject, keeping it in the same location in the frame, you are panning with your subject. This is a common technique among sports and action photographers who are capturing several images in a row with the subject in about the same position in the frame. Panning with a slow shutter speed creates a distinctive look.
If a car is driving down the street and you follow it in the viewfinder, keeping it in the same location in the frame while also using a slow shutter speed, the car will be mostly sharp, but the background will be blurry. The sharpness of the car will depend on how precisely you are able to match your panning motion with that of the car. The blurriness of the background will depend on what shutter speed you have chosen and how fast you move the camera.
Subject Size Matters
The size of the blur will depend on the motion of the subject and the length of the exposure, but the relative size of the subject in the frame is also important. If a field of flowers is being blown about by a wind, flowers that are closest to the camera will appear to be more blurry than ones in the background. All the flowers may be moving the same amount, but the ones closest to the camera will appear the largest and thus show the most motion.
Subject Direction Matters
One more factor that comes into play in the world of blur is the direction of motion by the subject. Think about a fast-moving car going left to right across the frame. Its position is changing as it moves. Now consider that same car from a head-on point of view. As it approaches you, its position in the viewfinder of the camera doesn’t change, but its size does, getting larger as it gets closer.
If the car is far away, the rate of size change relative to the frame is smaller than if the car is close. Subjects moving toward or away from the camera do not show as much relative movement as subjects that move across the frame. As a result, you’ll need faster shutter speeds to stop action that happens across the frame, but you can use slower shutter speeds with action that approaches the camera.
The Best Slow Shutter Speed
Optimum results from slow shutter speeds is a matter of personal taste. Getting the perfect blur on a panning shot of car driving down the street or a wispy blur of a waterfall in the forest is often achieved though test shots at different shutter speeds.


![Star Trails Photography in 7 Steps [2026]](https://www.davemorrowphotography.com/wp-content/uploads/2021/01/star-trails-photography3.jpg)

Street photography. It’s one of the most versatile and interesting genres of the medium. It’s also an elusive one, based on capturing real life situations filled with fleeting moments, light, expressions and interactions. And today, with a resurgence of lightweight mirrorless cameras and smartphone photography, more people are getting into it than ever before. Yet, despite its widespread adoption and high level of discipline and creativity needed to accomplish it, it is a genre largely ignored by the fine art world.
One possible reason for this may live inherently in the work itself—it’s supposed to be hard to like. One of street photography’s living masters, Joel Meyerowitz, describes it like this:
“[Street photography] was something made out of your guts, out of your instinct, and it was unwieldy in some way, not capable of being categorized by ordinary standards. So it was tough. It was tough to like, tough to see, tough to make, tough to draw meaning from.”
Most accomplished street photographers will tell you the same thing – they don’t do it for the fame. It comes from somewhere deeper inside; a desire to capture life as it is, to document and to reveal. Maybe in too harsh a way to be defined as “fine.”
1. Choose Your Lens(es) Carefully
Cameras are amazing instruments and we love all different kinds, but in street photography, the glass reins supreme. Fishing around for the right lens can be an expensive and frustrating process, so try to choose them carefully and in concert with the look you want to achieve.
2. Carry a Flash
Here’s a short list of some uses for a flash in street photography:
- - Filling shadows in portraits
- - Lighting interiors
- - Freezing the action of performers, cyclists, etc.
- - Adding light to night portraits
- - Adding contrast to dull scenes
- - Light painting for fun or to bring out shadow details
3. Know Your Gear
Opportunities rarely come twice in street photography. Don’t miss one because you couldn’t find a camera setting or selected the wrong one.
4. Know the Location
Ever see someone else’s photograph and marvel at how well the environment and subject seem to interact with each other? That’s usually because the photographer had already staked out that location and knew right where to shoot. When you’re shooting at home, know your city or better yet, rediscover it. Before you shoot in an unfamiliar location, research it. Knowing where to be and when to be there will make your outings more rewarding.
5. Develop your People Skills
It’s one thing to shoot incognito on the street and many photographers never approach their subjects. But, working a bit more closely with people will almost always result in images with greater emotional impact.
6. Capture Color
The streets are a marvelous place to find and exploit color. There’s the bright blossom of a flower that’s pushed through a crack in the sidewalk.
7. Capture Without Color
Another school of thought is that color only serves to distract from the main message of a street photo. A portrait may have more impact if you subtract the colors and let the wrinkles or expression tell the story. Shadows, textures, and patterns all might be accentuated more in black and white.
8. Try Some Close-Up Work
There’s more to the urban scene than the “normal” view. Just as in nature, there’s a whole other world to explore from a closer vantage point.
You don’t need a macro lens to photograph much of the miniature view on the street. It’s a target-rich environment—from the cracks in the sidewalk, to the peeling paint of a sign to the spider sunning itself in a store window.
9. Try Going Wide
A lens with a wide focal length (24mm or wider) can be a lot of fun in many street situations. Used parallel to the ground, a wide-angle lens will give you a great field of view. You can capture the foreground, the buildings, and sky all in the same frame. Shooting from a distance can even shrink the scene for a different perspective.
10. Work the Sunlight
Sunlight is an incredible tool, you just have to work different kinds in different ways. While portrait photographers bemoan the harsh direct light of midday, for a street photographer, the hard shadows that kind of light creates makes for wonderful shapes and abstractions.

Немає коментарів:
Дописати коментар